Add visual interest on a tiny budget with faux beams!
Faux beams. Heard of them? Today, we’ll tell you all about ours, and how to install them in case you’d like to hop on the faux wood beam bandwagon.
If you love the look of real wood beams in a home, then you’ll definitely want to consider the non-real thing. They are MUCH easier to install (they weigh almost nothing), and cost a FRACTION of what a real wood beam does. Read on and I’ll tell you all you need to know!

Wood Beam Inspiration
Beams. So dreamy. They are an architectural element extraordinaire. Some of you may be nodding your head in agreement and saying, “just show me how to make this lightweight, amazing faux beam diy already!”. If that’s you, scroll on down because the tutorial is below.
BUT. If you are saying yourself “wood beams…aren’t those kind of dated?” Then stop right there because I’ve got some gorgeous eye-candy that will change your (interior design) world.
1. “Woodn’t” You LOVE To Have This Kitchen
2. Add Warmth to a Living Space
See what I mean? I love ’em. Always have. To me, they say, “Come on in and snuggle by the fire”…
Pssst…more beam jobs to come, but really quickly before you decide to give this project a go, make it a little easier…
Download a free printable copy of the supply list and installation tips & tricks. Click here or on the image below to get started now⤵

3. Timeless Design
Or, “Join us for a relaxing dinner in our cozy (but extremely elegant) kitchen.”
4. Accent a Tall Ceiling
and “Prop your feet up and relax in our rustic retreat”. I have major ceiling height envy here – the wood beams make it all pop!
5. Add Texture and Visual Interest
And take the cozy factor to the next level, like Haneen does in this incredibly posh, luxe living space thanks to, well, a LOT of things, but those ceiling beams definitely are icing on a beautiful cake!
Get Wood Beams on a Budget
You know what else wood beams say? Something like: “Are you the type of homeowner that likes paying for things through the nose? Then buy some of us!” And when I realized this, suddenly, the beam dream became obscene. And so ended my love affair with beams…
Or so I thought. It may be a bit of a sordid love story, but I’d love to spill all the steamy, sexy details to you! Come on into my living room and we’ll have a little chit-chat.

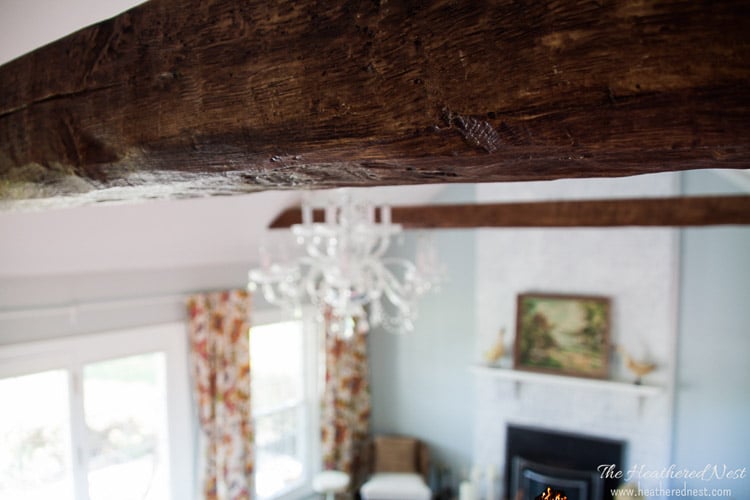
Here we are. Do you see those beams? Yes, those gorgeous mahogany hand-hewn looking beauties above? Guess what? THEY’RE FAKE! That’s right, I said it. We got a beam job…or “beam augmentation” if you will.

We discovered FAUX BEAMS! And just like that, my love affair with beams was back on again. For just a fraction (like 1/5) of the cost of REAL wood beams, and just a teensy, tiny percentage of the weight (which is important for installation), it is possible to buy and install these faux wood decorative beams.

And guess what? They look real. Seriously. Hallelujah, hap-beam days are here again!! Wanna know how to work with them? The male half of the Heathered Nest is gonna give you the crash course (without the crashing part. That would be a bad outcome)…

And grab your free copy of the DIY guide for this project to make it simpler! Click here or on the picture below to get instant access now!⤵️
How to Install Faux Beams
Let’s talk about which supplies and materials you’ll need if you decide to install your own faux beams (which you should).

DIY Faux Beams Installation Supplies
How to Make Faux Wood Beams
We opted to purchase our faux wood beams for this project. But, if you would rather completely DIY some beams instead of buying them, you can do that! Check out my friend Larissa’s tutorial on Prodigal Pieces.
Step by Step Directions for Installing Faux Wood Beams
First of all, don’t be scared because this isn’t too hard of a DIY project!
1. Determine the Number and Layout of the Ceiling Beams
Yes, that sounds obvious. But there are so many options (color/style/texture) for these faux beams, that this was actually the most challenging part of the project for us!
Faux wood products are made for all different aesthetics, from the rough, hand-hewn rustic look (which we went with) to sleeker, smoother, and more minimal ceiling beams.
Here’s an image of our family room BEFORE the installation.

The ceilings in this space are high and vaulted, which we love. But there was no “wow” to highlight that feature. We thought beams would add some interest and draw the eye up. At the same time, they could help maintain a cozy atmosphere in the space.
I also knew I wanted to replace that ceiling fan (I know all you fan lovers…I KNOW how useful they are) in the center of the room with a big, super-glam chandelier.
We ended up with two faux beams (our exact beam is no longer available online, so I’ve linked to where we purchased. Ours are walnut tone, 7-3/4in x 6-1/8in x 14ft x 9in, 3-sided), based on the size of our room and the location of the chandelier.
Although the size of the beams you choose is mostly a factor of your own personal taste, the scale is important. The higher the ceiling the bigger the beam you’ll probably want. Luckily, faux ceiling beams come in many custom sizes, so finding the perfect beam for your situation shouldn’t be too difficult.
2. Install joist hangers.
Joist hangers you say? Aren’t those for hanging joists? Yes, they are, but they also come in handy when installing faux wood beams!
Our beams were placed in a room with a vaulted ceiling, so we used joist hangers that were adjustable to the angle of the ceiling. If you’re lucky, you have a stud where you want to put the hangers, which makes them pretty easy to install.
If not, you need to use anchors…not a big deal in this situation since the faux beams are so light (they are made of high-density foam…see image below).
The key here is to get all four joist hangers (two per beam) at the same height and level. This helps when installing the beams. A laser level comes in handy here, or a string with a line-level/bubble level will work too.
3. Install the 2×4’s into the hangers.
Depending on the span needed, you’ll have to “sister”, or screw two 2×4’s together. Remember, they make 2×4’s up to 16’ in length, so get the longest 2×4 you need to fit the span. This will give your beam more strength. Sistering two 8’ 2×4’s together to make a 16’ span would be a bad plan. Once you’ve sistered your 2×4’s, cut them to length.
Don’t forget! You can make this project quicker and easier by downloading the free printable supply list and installation tips and tricks for this project!
Click here or on that picture below – I’ll send your free guide immediately ⤵️
In the case of a cathedral ceiling, angles will need to be cut on the ends of the 2×4’s. To measure this angle you can use an angle finder.
Once cut to length, you will simply set them in the joist hangers and screw them to the hanger. You are now about 75% done with this project!
BAD PICTURE ALERT BELOW…but you can kind of see the “sistered” 2×4’s in this image if you look closely. You can also see the ends of the 2×4’s sitting in the joist hangers.
Finally, check out those red poles sitting beneath either end of the 2×4’s. Those are telescoping work poles, and they were pretty clutch for completing this project (and have helped us in numerous others).

4. Cut the faux wooden beams to length.
Because of the angled ceiling, we were working with, this part of the project was a little daunting. The beams had to be cut at an angle, and getting that angle right was tricky. Use the angle finder to measure the angle of the ceiling (remember, measure twice, cut once).
The actual cutting of the beams is no problem! You could almost use a butter knife (don’t try using a butter knife, though…use a hand saw). After some trial and error finding the angle, we finally got it pretty close.
Truth be told, the beams don’t fit super tight to the ceiling, but because the ceiling is white and the beam is dark, you can’t tell at all, so it worked out great.

5. Install the faux beams.
It’s the moment of truth! Believe or not, this is the easiest part. But make sure you have two people. Some styles of faux wood beams are 4-sided, but ours is a 3-sided variety, meaning it is shaped like a “U”, with the top open (see image below).
Lift the beam up (open side, if you have one, toward the ceiling) to cover the 2×4 “joist” you installed.
Depending on the width of your beam, it might be a snug fit. If not, cut a few 2×4 or scrap wood spacers and screw them to the joist. Use spacers every few feet or so.

Lift the beam back up and see if you have a snug fit. If not, repeat this process with various size spacers. Once the beam fits up there nicely, put a level on it and get it nice and straight.
Even if your joists are a little off, you can still make the beam perfectly level. Now simply screw through the faux beam into the joist. We used black drywall screws, which can’t even be seen with our particular beam once installed.

But if you can see the holes from the screws, fill those screw holes with wood putty (make sure the putty matches the beam) and there you have it…beautiful faux wood beams…and no one will be able to tell the difference!

Final Thoughts About Faux Wood Beams
So come on! Faux-get about it! Consider giving faux wood ceiling beams a try. We “wood” love to see how they turn out if you do!

Want shopping sources for this space? Here you go! Just click on the product you’d like to learn more about, and you’ll be taken to the retailer.


Looking for more budget-friendly DIY ideas to decorate your home? Here are some of our favorites:
Pin this post for later! And if you install some beams, leave a comment (or better yet, a photo) on the pin! That helps others know whether they want to try this project, too!

Pssst…before you go, I sure would love to hang out with you again really soon! Sign up now and get a FREE copy of “Builder-Grade To Beautiful: 10 Totally Transformative Home Decorating Solutions, All Under $100!” Click here to enter your email or on the image below. Your copy will be sent right away!

