This post may contain affiliate links. If you make a purchase through one of my links, I may make a small profit at no expense to you. For further information, please view my policies.
Not to toot my own horn, but… this is by far the best, most comprehensive guide on the internet about painting Ikea laminate furniture. This guide is very extensive and it might be too much to take in all at once. I recommend you bookmark it or pin it, so that you can come back to it when you need to.
I really want you to succeed with your project!
Quick note from me, the author!
I’ve updated and edited this post continuously since first publishing it in 2019. I’ve tried to make it as information dense, yet as clear as possible for you. Fast forward to 2025, there are literally thousands of other posts out there about this topic – many of which have borrowed bits and pieces of information from this post. I’m glad you found this one, and I hope you find this article to be as useful as the tens of thousands of people before you have over the years!
This guide will cover:
▶️ how to paint ikea laminate furniture
▶️ whether or not you need to sand and prime
▶️ what type of paint to use and how to apply it
▶️ the absolute best kind of primer to use for laminate
▶️ what kind of final topcoat (sealer) to use
How To Paint Ikea Furniture Like a Pro!
Painting your IKEA furniture can be a relatively fast and very cost effective way to upgrade your space and inject new style into your home.
There are endless ways to personalize (or “hack”) your IKEA products and paint is just one of the many. And that’s what we’ll be covering today.
How to paint IKEA laminate furniture
Painting laminate pieces is the trickiest surface to get right, so we’ll start by talking about that one. You hear a lot of horror stories about how it all went wrong and the paint started peeling off after 2 days.
Your paint is not going to peel off if you follow these steps and use the primer I mention below!
This method doesn’t require sanding your piece before priming and painting. Some people swear by sanding every single layer in order to get a perfectly pristine and smooth finish. By all means, you can absolutely do this if you want to, it certainly won’t ruin any of your work! Decide if it’s worth the effort and go for it if you feel like it’s necessary 🙂
MATERIALS:
- Shellac-base primer – I recommend this one from Zinsser. It is what I use personally and I can’t guarantee your results if you use other primers.
- Sanding paper (optional)
- Brushes, rollers or spray gun
- Rag or paper towels
- Paint
- Topcoat
STEPS FOR PAINTING ON LAMINATE:
1. Disassemble furniture if you can. If you can’t disassemble, at least remove any hardware like knobs or pulls.
2. Wipe down your furniture with water and a damp (not sopping wet!) paper towel or cloth. You want to remove any dust, dirt or residue that can be removed so that it doesn’t get trapped underneath the paint. Allow to dry, it doesn’t take long.
3. Prime – usually only one coat is needed.
OPTIONAL: You can scuff the primer with sanding paper once it’s dry if you want but it’s not really necessary. If you really want to sand your primer, go ahead and do it! Allow time to dry according to instructions on the product.
4. Paint your piece. You may require multiple coats of paint – make sure you allow time to dry in between coats.
OPTIONAL: You can sand between coats of paint if you want to! I recommend doing this if you have visible drips, brush strokes or any small debris caught in your paint. Sanding will smooth all of that out.
5. Once your furniture is completely dry, you can add your topcoat (sealant). Allow time to dry according to instructions on the product.
6. Reassemble if needed, and put back all the hardware.
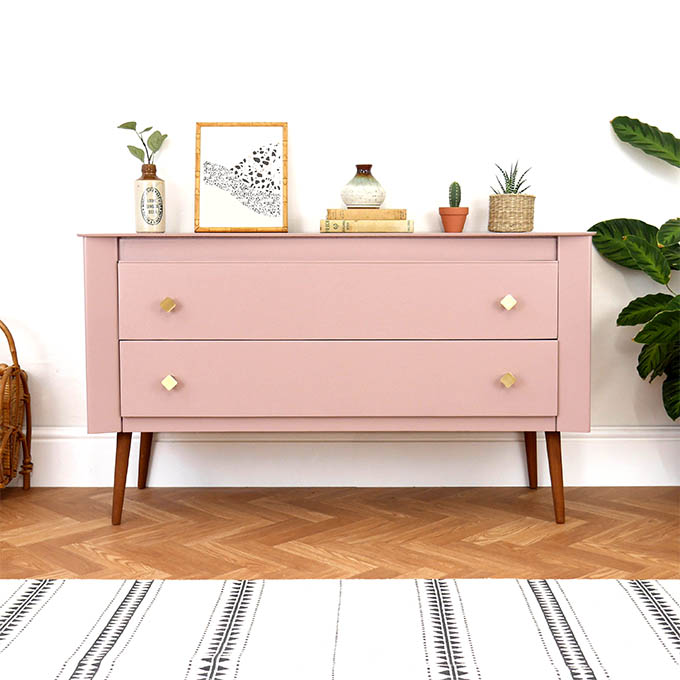
Example Laminate Paint project
Below is an example of laminate furniture that I painted one summer for my mom. I painted this back in 2018 and obviously trends have evolved since then ☺️ most people would probably keep the wood tone now. It’s actually not an IKEA piece, but it’s still a good example project for this article!
After removing the mirror, I primed it with one coat of Zinsser (did not sand!!) and gave it 4 coats of paint. The reason I needed to give it 4 coats was due to the low quality of the paint I was working with – it was just your regular, run-of-the-mill indoor water-based latex paint. It was just what my mom had on hand… If you have better quality paint, you won’t have to use so much. You’ll probably be able to get away with far fewer coats of paint.
MOST COMMON QUESTIONS ABOUT PAINTING IKEA FURNITURE:
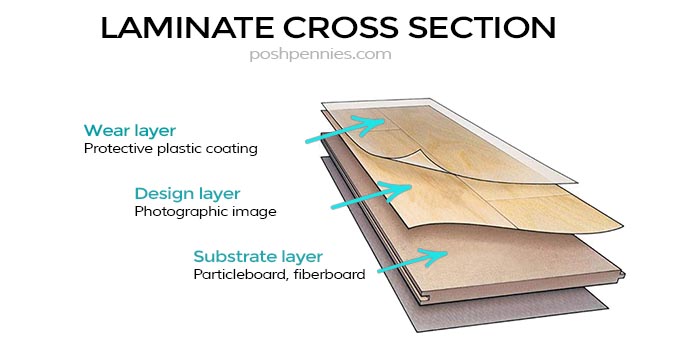
What is laminate?
Something that is laminated is essentially something covered in plastic. Laminate furniture is basically a photo of wood texture, slapped onto a piece of particle board, and then covered with a clear plastic coating.
Here, let me illustrate what I mean:
Do I paint assembled or disassembled?
You are going to make your life a lot easier if you paint your IKEA furniture when it’s disassembled. If you already know you are going to paint your piece right off the bat when you buy it, then great. Just don’t assemble it!
On the other hand, maybe you don’t have time to disassemble. Or you’ve had your piece so long that you lost the tools (I actually have about 2 million different IKEA allen keys). It’s ok. You can still go ahead and paint.
You can cut corners by not disassembling, but be warned that certain steps later are going to take you a bit longer.
Time wise, in the end it kind of evens out.
If you choose to paint with your piece still assembled, you may need to mask off certain areas: you can do this with painter’s tape to get clean lines and minimize the risk of the paint bleeding where you don’t want it to. I linked some good tapes below.
Moral of the story: if your piece is already assembled, I would strongly suggest disassembling it. You will get a more professional looking finish if you take the time to do this.
Do I need to sand my Laminate piece first?

This is a widely debated topic so I will tell you what I know from my own personal experience. I’ve been painting different types of furniture for over 20 years. Yes, I am that old.
- If you’re painting over laminate, NO, sanding is not necessary. Contrary to what a lot of tutorials say out there, you don’t HAVE to sand your laminate furniture before painting … provided that you follow the correct steps, which I covered above. You CAN sand if you want to, but it’s not 100% necessary. Do whatever you think is best for you. If you prime properly, you have the option to skip sanding.
What’s a primer and do I need it?!?
Primer is basically a base coat of paint that prepares your surface for receiving the final finishing paint. It helps provide a smooth surface to paint your final color on and helps with paint adhesion.
Some people live life on the edge and skip the primer, and it doesn’t even haunt them late at night.
However, I would suggest NOT skipping the primer.
The best primer in the world for painting laminate (trust me)
This shellac based primer is the one all the professional painters rave about. This is why it’s awesome and you should use it:
- it sticks to ALL surfaces *** WITHOUT SANDING ***, so it will work for laminate, solid wood and metal.
- dries really quickly.
- covers all odors, even nasty ones like cat urine and stale smoke.
- seals stains and knots and provides a perfect base for your finish paint.
- works with ANY top coat.
So you really cannot go wrong. I highly recommend you choose to use this primer; if you do, then you can skip the rest of the following information on primers.
NOTE: MAKE SURE YOU GET *SHELLAC BASE PRIMER* !!!!
Did I just burn your retinas with that yellow background? Good. You get my point. It’s important!
WARNING: I am going to sound like a jerk now. If the inexperienced employee at the big box store paint desk, advises you against using the Zinsser shellac primer, or suggests you buy something else, please IGNORE THEM! I have heard so many people over the years say “I talked to the person at the paint desk and they said not to use the Zinsser shellac, and said to use *insert whatever else product* instead, and now my project is ruined”. Unfortunately, 90% of the time, big box store employees don’t know what they’re talking about. If you follow their advice, you are doing so at your own risk.
If you don’t plan on using the primer mentioned above, then you will need to keep the following things in mind:
- If you’re going to be painting with a water based latex paint, then you must use a water based primer. Technically you can use an oil based primer and then paint on top with latex paint, but just keep your life simple and make sure they match.
- If you are painting with an oil based finish paint, you must use an oil based primer. No exceptions.
I’ve gotten a lot of questions over the years with people asking me why something went wrong with their project and the first question I always ask is “which primer did you use”? The next reason for problems is usually user error. Many of which can be avoided by reading this guide! 😊
Anyyyyways, no matter what, you really need to use a primer. Don’t skip this.
↓ QUICK TIP ↓
If your final paint color is going to be dark, ask the paint mixer to tint your primer. The tint can be a greyish blue color, or you can have it tinted to a similar color to your finish paint. This will help coverage, won’t be as difficult to conceal versus having a pure white primed base, and thus will require fewer coats of your final color. Which ultimately saves you time and money.
What kind of paint should I use For Painting Laminate Furniture? Pros and Cons!
So by now you have learned that if you go with the Zinsser Primer I mentioned above, then you can choose any kind of paint you like.
If you have another kind of primer, check to see what kind it is and make sure to get the appropriate type of paint. You can always ask the people at the paint store – they should know basic stuff at least. Hopefully.
WATER BASED PAINT
Pros:
- Water based paints (latex, aka plastic) are popular because they emit fewer toxic fumes than oil based paints
- They are easy clean up as you only need water
- They dry quickly and are flexible
- Will not yellow over time
Cons:
- The disadvantage to painting furniture with water based latex paints is that you run the risk that sometimes the paint won’t behave as planned, which can result in stains and wood knot bleeding, which is disastrous (this has happened to me – I didn’t prime first). If you use primer, you should be able to avoid this happening, however water based primers are known to have the same issue (staining/bleeding).
- Less durable than oil based paints
OIL BASED PAINT
Pros:
- Oil based paints provide excellent durability
- They cover any odors that may be stuck in your furniture much better than water based paints
Cons:
- The clean up is tedious as you need mineral spirits or turpentine to clean your paint brushes as opposed to just water. If you don’t clean your brushes with mineral spirits after painting with oil based paints, you can kiss your brushes goodbye once they dry
- Oil based paint can yellow over time
- Less flexible than latex water based paints, meaning it can crack
- Very strong odor during application
- Longer drying times
CHALK PAINT
Pros:
- Lends itself well to distressing for a “shabby” or vintage look
- Some stunning effects can be achieved by layering chalk paints
Cons:
- Visible brush strokes
- Often requires multiple coats to get an even finish
- Less durable than latex paint
If you are painting laminate furniture with chalk paint, you will still need to prime first. You must seal furniture painted with chalk paint with wax. All chalk paint is is latex paint with powder mixed in – usually plaster of Paris.
It is incredibly easy to DIY your own chalk paint if you don’t want to buy the ready-made stuff.
Learn more about how to chalk paint IKEA furniture here.
SPRAY PAINT
Pros:
- Easy to apply
- Even coverage, provided that it’s applied properly
- Dries quickly
Cons:
- Can require multiple cans for a large project, which gets pricey
- Difficult to get even coverage on large pieces
- Can drip if not sprayed properly
- Strong odor during application
What are the best tools to apply my paint?
To paint your IKEA furniture you can use any of the following:
- spray gun
- roller
- synthetic or natural bristle brushes
- foam brushes
Spray Guns
Spray guns can be tricky to use because you can’t just dump the paint in the canister and spray – you need to thin your paint first. If you don’t get the paint consistency right, you will have a lot of problems getting your paint to spray properly – it won’t come out at all if it’s too thick, or will come out in fat droplets if it’s too thick or thin. Cleaning your paint spray gun is also a massive pain. But once you get the hang of them they speed up the process significantly.
Rollers
Rollers are handy and allow for lighting-fast paint application. If you use a roller that is wider than the opening of your paint can, you’ll need to remember to get a tray or something to put your paint in.
↓ QUICK TIP ↓
If you use a paint tray, you can line it with plastic for super quick clean up! Or, what if you need to stop painting for the day, but you’re not done with your project and you have a bunch of good paint in the tray? No need for that to go to waste, paint costs good money! Just throw a plastic bag over your tray and pop it in the fridge! It’ll stay fresh until you are able to pick up the project in the next day or two.
Brushes
Foam brushes are good and generally ensure smooth application in terms of brush strokes. They are cheap and pretty much only good for one time use so you’ll have to throw them away once you’re done. You could try to clean them with water if you’re using water based products but it may not be worth the effort.
Bristle brushes are my favorite method of application for painting furniture, but they sometimes can lose a hair or two along the way. Be sure to remove any stray bristles immediately if you see any. Tweezers help, or just pinch with your fingernails then touch up with another stroke of paint. I prefer angled brushes to flat brushes as it allows for a more comfortable wrist position while I’m painting.
Brushes can come in natural bristles or synthetic bristles. Choose whichever you like. Natural bristles can leave more obvious brush strokes whereas synthetic bristles generally provide a smoother application.
↓ QUICK TIP ↓
Don’t make your life difficult and buy brushes that are too small. It will take you forever and will be incredibly frustrating. I recommend using a combination of tools when tackling furniture painting projects: a roller for large surfaces and a couple of different sizes brushes for harder to reach areas or for areas like grooves.
When you’re done, you must make sure to clean your brushes appropriately based on the type of paint you used. Water for water based paint, and turpentine/mineral spirits/paint thinner for oil based and shellac paints.
What should I use to seal my piece? Everything you need to know about topcoats
Sealants, varnishes and top coats can be really confusing. They’re also especially intimidating because they are the very last step after all the work you’ve put in to paint your piece. If you get it wrong, you risk messing everything up. I have done this and it sucks.
If you’re not sure what kind of topcoat to use, read on. It’s best to not have any doubts when choosing a topcoat.
One thing is for sure, and that is that you probably definitely maybe want to use one. It will ensure that your piece and the paint job underneath is protected from wear and tear. I say that and I never seal my pieces because I just can’t be bothered so… you do you.
POLYURETHANE
I recommend using water based polyurethane topcoats.
Oil based top coats will yellow over time (similar to oil based paints!). You really don’t want this happening, especially if you’re sealing a very light or white piece.
↓ QUICK TIP ↓
You CAN use a water based top coat over an oil based paint, you just need to make sure the paint has dried completely before sealing.
My top recommendation for a water based sealant is Minwax Polycrylic (check links below to purchase).
You can choose either a matte finish, semi gloss finish, a gloss finish or a satin finish.
You can use Minwax Polycrylic over both oil based and water based paints.
To be safe, you can always test a small patch in an inconspicuous area before finishing the whole piece.
WAX
If you painted your IKEA furniture with chalk paint, some say that the best way to go is by sealing with wax.
I would tend to disagree.
Wax sealed pieces give a nice velvety finish but are not as durable as pieces sealed with acrylic varnishes.
Wax is not a permanent finish, meaning that it will need to be reapplied every so often. The other tedious thing about sealing with wax is that if you ever want to repaint your furniture, the wax MUST be removed otherwise your new paint will not adhere to the surface.
Removing the wax topcoat involves wiping everything down with mineral spirits and ain’t nobody got time for that.
If you do want to seal with wax, I recommend Minwax Paste Finishing Wax in Natural.
But I would recommend using the Minwax Polycrylic Matte Poly finish instead.
I hope this article gave you the confidence to tackle your laminate IKEA furniture painting project! And that you feel a bit more confident about how to paint Ikea furniture! I’d love to hear what you get up to, and I’m always available to answer any questions! Do not hesitate to drop me a comment below! Now get painting! 😁
Watch my videos on how to paint Ikea furniture 🙂
You can also watch me paint and transform this boring Kallax unit:
NEED SOME IKEA PAINTING INSPO? THEN YOU MIGHT LOVE THESE ARTICLES:
10 *STUNNING* WAYS TO HACK THE IKEA IVAR
18 HACKS TO COMPLETELY TRANSFORM YOUR KALLAX
12 WAYS TO TAKE YOUR BILLY BOOKCASE FROM DRAB TO FAB
Hey there!
Did this article give you some great ideas or teach you something new? Help me keep the content coming! Simply bookmark my Amazon link and then shop through it! Every purchase you make could earn me a small commission, at zero extra cost to you. Your incredible support keeps this little website alive and thriving. Much love, thanks a bunch! 🌟