- “An authentication error has occurred. The Local Security Authority cannot be contacted.”
- “The remote computer that you are trying to connect to requires Network Level Authentication (NLA), but your Windows domain controller cannot be contacted to perform NLA. If you are an administrator on the remote computer, you can disable NLA by using the options on the Remote tab of the System Properties dialog box.”

Basic steps:
- Disable NLA on the EC2 instance.
- Log onto the EC2 instance using a local administrator account and re-add the machine to your domain. domain.
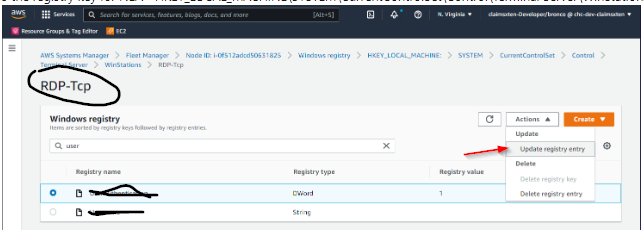
1: Disable NLA on the EC2 instance
- Open AWS Sytems Manager.
- Under Node Management select Fleet Manager.
- In the Node filter filter by the node id for the EC2 instance. ex. Node ID: i-0fsfffdg0631s5
- Select the node and then Windows registry in the Tools panel.
- Navigate to the registry key for NLA — HKEY_LOCAL_MACHINE\SYSTEM\CurrentControlSet\Control\Terminal Server\WinStations\RDP-Tcp\UserAuthentication and change the
value to 0.

You can deactivate NLA on the unreachable instance using one of the following methods:
- Deactivate NLA using Systems Manager AWS-RunPowerShellScript document.
- Manually change the registry offline.
- 1. Open the AWS Systems Manager console.
- 2. From the Instances & Nodes section of the navigation pane, choose Run Command.
- 3. For Command document, select AWS-RunPowerShellScript.
- 4. For Command parameters, enter the following commands:
reg add "HKLM\SYSTEM\CurrentControlSet\Control\TerminalServer\WinStations\RDP-Tcp" /v SecurityLayer /t REG_DWORD /d 0 /freg add "HKLM\SYSTEM\CurrentControlSet\Control\TerminalServer\WinStations\RDP-Tcp" /v UserAuthentication /t REG_DWORD /d 0 /freg add "HKLM\SYSTEM\CurrentControlSet\Control\TerminalServer\WinStations\RDP-Tcp" /v fAllowSecProtocolNegotiation /t REG_DWORD /d 0 /f
5. For Targets, select Choose instances manually.
6. Select your instance.
7. Choose Run.
8. Wait until the Overall status changes to Success. Refresh the page after 2 minutes.
9. Restart the instance.
10. Log in to the instance using RDP.
Manually make registry changes offline
- Stop the unreachable instance and detach the root volume.
- Launch a new instance in the same Availability Zone as the original instance you just stopped. This becomes your rescue instance. It’s a best practice to launch a Windows version that is different from the unreachable instance. This avoids disk signature issues.
- Attach the detached volume to the rescue instance as /dev/xvdf.
- Connect to the rescue instance using RDP, and then bring the volume you just attached online in Disk Manager.
- Run regedit.exe to open the Registry editor.
- Select HKEY_LOCAL_MACHINE and then select File, Load Hive.
- Navigate to the Windows folder on the attached volume, and then select the SYSTEM file. The default path is D:\Windows\System32\config.
- Name the SYSTEM file. For example, badsys.
- badsys now appears under HKEY_LOCAL_MACHINE. Under badsys, navigate to ControlSet001, Control, Terminal Server, WinStations, RDP-Tcp.
- Double-click SecurityLayer and set its value data to 0. Select UserAuthentication and set its value data to 0. Then, select AllowSecProtocolNegotiation and set its value data to 0.
- Scroll up and select badsys, File, Unload Hive.
- After the hive unloads, open Disk Manager and take the disk offline.
- Detach the volume from the rescue instance and attach it to the unreachable instance as the root volume ( /dev/sda1).
- Start the instance and test RDP.
Reference:
https://aws.amazon.com/premiumsupport/knowledge-center/ec2-windows-rdp-authentication-errors/