Photography Storytelling: How to Create Visual Narratives
Storytelling might not be the first thing that comes to mind when you hear the word “photography.”
Usually, we take photographs to document moments in time or to create a direct representation of something we find interesting, such as a beautiful building or flower.
When used for these purposes, the camera is merely a “recording device” rather than a creative tool—it captures things that already exist, such as people or objects.
The Camera as a Storytelling Device
However, cameras are actually a wonderful tool for telling stories, too.
In fact, I would argue that this is the more interesting use case of photography.
Sure, there is a lot of beauty (and skill) in taking an aesthetic, correctly exposed shot of a majestic swan, for example.
Still, photographs that tell a story have more depth and finesse than images that merely depict reality without a narrative.
If you want to learn how to tell a story through photography, read on.
In today’s post, I will share my best tips for photography storytelling. Let’s get started!
Approaching Photography Like a Filmmaker
When it comes to telling a story through photography, I’ve developed a fun technique that’s been super helpful in my self-portrait photography.
Basically, I approach each photo shoot as if I were making a movie, wearing the different hats of screenwriter, director, set designer, and so on.
I will outline each stage below so you understand what I mean 😊.
By the way, I use this framework for self-portrait/studio photography, but it also works for general portraits, documentary photography, street photography, and many other types of photography.
Step 1: Think Like a Screenwriter–Develop Your “Script”
If you want to tell a story through your photographs, you first need to know what that story is.
Grab a pen and paper and make some notes, answering the following questions:
What Is The “Plot” of Your Image or Series?
Who Is The Hero/Heroine?
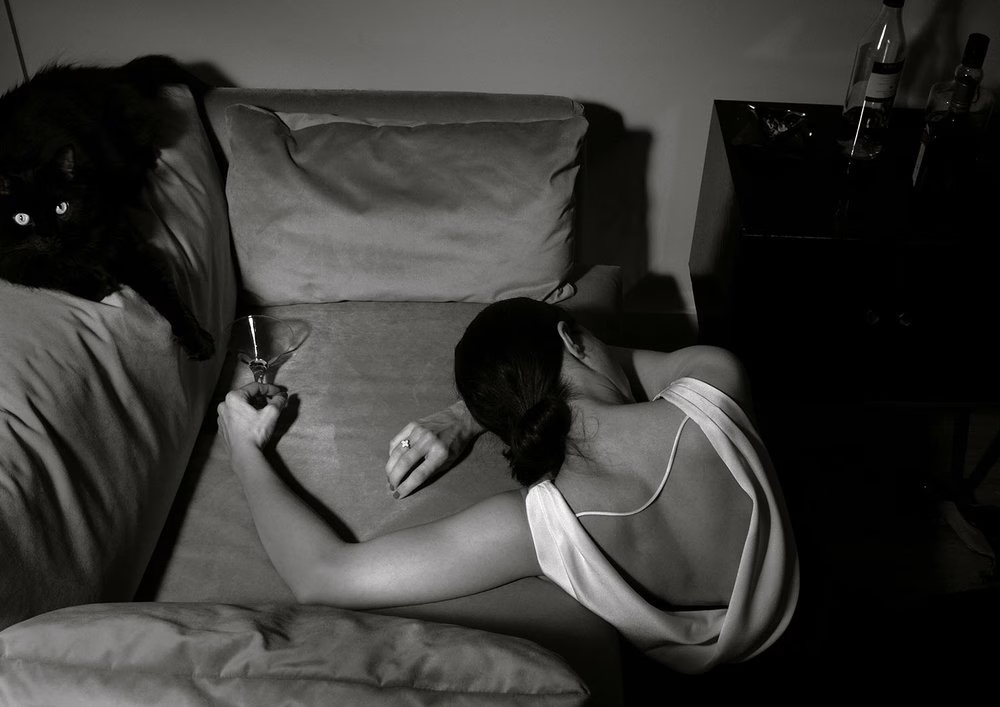
This doesn’t have to be very elaborate; it could simply be “a lonely woman sitting in her living room.”
Obviously, you’re not writing a movie script here–you just want to have a concept that will serve as a starting point for your photo shoot.
I’ll give you an example of my most recent shoot:
I took a self-portrait based on the bittersweet emotions you feel when a relationship ends.
You know you won’t see that person again, but you’re grateful for the beauty they brought to your life.
Based on these emotions, I developed the following (fantasy/fairytale) story:
A woman breaks up with her partner because their relationship isn’t right.
She feels heartbroken and sad and cries a lake of tears.
However, out of the sadness grows something beautiful: a forget-me-not flower, representing the treasured memories of the relationship.
Here’s the photo:

What Emotions Do You Want to Convey?
If you’re a regular reader of this blog, you know I keep banging on about emotions as a starting point for your photographs–because it works.
Think of virtually ANY story you like, be it your favourite novel or a popular blockbuster.
What drives the behaviour of the characters?
What makes the story compelling?
What enables the “hero’s journey”, the story arch of a character that becomes stronger through facing challenges, etc.?
You will find that all of this is based on emotions, just as our lives are governed by the different emotions we experience every day.
That’s why it’s so powerful to consider what emotion you want to portray in your photograph.
When done right, people will feel that same emotion when they look at the image.
Pick One Emotion to Focus on
I like to pick one main emotion (like sadness in the photo above) and develop my “plot” or story around it.
Try this—it tends to result in compelling and evocative images.
By the way, this doesn’t only work for self-portraits or portraits.
Emotion is a fantastic storytelling device in most other genres, too, be it street photography, documentary photography, or even wildlife photography.
For example, think of an evocative photograph of a fight between two animals, which can represent the emotion of anger or rage.
Which Format Will You Use?
Finally, decide which format you will use for your photographic storytelling.
Do you want to create a single image or a series?
Naturally, a series makes storytelling slightly easier because you can spread the narrative over several images.
However, single shots work perfectly, too (I mainly shoot single images).
If you do want to shoot a series, think about your overarching narrative and how many images you will need to tell the whole story.
It can be useful to start your series with an “establishing shot”, i.e. a location, and then develop the story from there.
Before I get to the next section…did you know you can download my free portrait photography ebook? More info below:
Free Ebook: 50 Portrait Photography Ideas
If you love portrait photography, but need some fresh inspiration, download my e-book which contains 50 creative ideas and projects for portrait photography.
…but now, back to the blog post!
Step 2: Think Like a Set Designer
Next, put the set designer hat on.
Answer the following questions:
Where does the “plot” of your story take place?
What’s the setting for the image—nature, a studio, your flat, a public place, etc.?
Will you need any props to tell your story?
Props are amazing storytelling devices because objects are loaded with symbolism.
Candles, feathers, eggs, roses, and mirrors are good examples (this article explains prop symbolism in more detail.
A really nice variation on storytelling photography is using props only, i.e. creating a still life.
Since different objects have different meanings and associations, you can tell a whole story by arranging a few items on a table, for example.
You can then further enhance the narrative with intentional lighting and colour grading.
An example would be a plate with a half-eaten apple, an ashtray with a burning cigarette, and a chair that’s been knocked over.
Immediately, the viewer of the picture would wonder who had been sitting at the table and if there had been any force or violence involved in the person leaving the scene, given the chair on the floor and the unextinguished cigarette.
You certainly don’t need any fancy location or props at all.
You can tell a whole story through someone’s facial expression in a close-up portrait, for example.
However, if you enjoy working with props or scouting interesting locations, don’t skip this step; it can be very effective.
Once you’ve decided on a location and some props, it’s time for the next step:
Step 3: Think Like a Hair Stylist/Makeup Artist
If you’re a self-portrait or portrait photographer, I highly recommend using hair and makeup for your storytelling photography.
First, it’s a lot of fun, especially if you take self-portraits like me.
But beyond that, it really helps with developing the “character” of your story.
Here’s an example of a recent shoot I did:
I wanted to express the complexity of female sex and pleasure–the way we all want to be confident femmes fatales, but often feel vulnerable, exposed or uneasy during or after sexual encounters.
I really wanted to underscore that feeling of shame and embarrassment, and I thought that a clown was the perfect embodiment of this.
After all, clowns are known for being foolish, clumsy and awkward!
Hence, I used white clown make-up as my storytelling device, combined with contrasting sensual lingerie to emphasise the uncomfortable mood of the image further.
Here’s the photo:

Here’s another example of me using makeup as a storytelling device.
In this photo, I wanted to transform myself into a hyper-confident alpha female, an almost feral woman:

I used red, pointy, fake nails and smudged red lipstick.
The latter was meant to make it look like I just (metaphorically) devoured some pray, evoking associations with blood.
In this example, the makeup almost becomes the character—the image wouldn’t work without the wildcat-like nails and the blood-red lipstick.
If you find it challenging to come up with ideas, it helps to watch some movie classics where makeup and hair often support the narrative.
I sometimes go to the cinema with the sole purpose of getting inspiration for photo shoots 😊
Before we move on to the next step, did you know you can register for my free cinematic portrait email challenge, which is all about photography storytelling? More info below!
Free 7-Day Cinematic Portrait E-Mail Challenge!
Do you want to master cinematic portrait photography in seven days? Then sign up for my free email challenge with a different creative prompt every day!

Next, let’s continue to step 4.
Step 4: Think Like a Cinematographer
The cinematographer is responsible for directing the overall look and feel of a movie, including composition, lighting, framing, and colour.
You’ve already decided on the story you want to tell and the setting for your photograph.
Now, make some creative, “cinematic” decisions. Answer the following questions:
How do you want to frame your subject?
What will the composition of your image be?
What lens will you need to achieve that effect?
For example, I recently created the photograph below, which tells a sort of Bible-inspired story of “seductive Eve with an apple in the bathtub”.
(I know, it’s weird, but your story doesn’t need to make sense to anyone else but you 😊).
I decided to take the photo from a viewpoint above me, pointing the lens down at the bathtub so that you could see the pink water creating a nice contrast with the green apple:

A big part of cinematography is creating a particular mood.
Apply this to your photo shoot by brainstorming what mood you want to create and how to do so.
Think: What word would sum up the mood you’re looking for (e.g. dreamy, sombre, mysterious, etc)?
What tools could you use to achieve that mood, such as composition, lighting, framing, or certain techniques such as motion blur, slow shutter speed, double exposure, etc.?
Using Colour Grading
The other big tool to achieve a certain mood is colour grading.
In movies, this is done intentionally to achieve a desired aesthetic and “vibe”.
Consequently, with your cinematographer hat on, you want to be just as intentional and use colour as a storytelling device.
You can do this either by using props, clothes, and makeup in certain colours or by colour grading your picture in post-production.
You may be wondering how colour can be a storytelling device.
As you probably know, colours carry a lot of meaning and symbolism.
There is a whole colour psychology theory, which states that colours have qualities that can evoke certain emotions in people.
You can find more detail about this in my previous article here, but most of it is instinctive anyway.
We all know that blue is meant to symbolise sadness or that red stands for passion and love, for example.
Don’t underestimate the effect of colours in visual storytelling.
Sure, most people will not consciously “decipher” the psychology of different languages.
However, we all associate certain colours with similar emotions; hence, we will pick up on the general mood of a picture based on the colours or colour grading within it.
If you want to learn the basics of colour grading, check out my previous post here.
Step 5: Think Like an Editor
In the final step, you want to finetune your “raw footage”.
If you shot a series, now is the time to arrange the images in the desired order and remove photos that don’t serve your narrative.
This fifth step also includes the post-production of your image(s) in editing software.
I often use Photoshop as a visual storytelling device in its own right, compositing additional elements, changing colours, or giving the image an overall colour grade (see step 4).
You can also use Photoshop to remove elements in your photograph that distract from your “story”, such as non-important details in the background.
You could even add specific effects or textures to enhance your story or mood, for example canvas/paper textures to create a painterly look.
Hopefully you will find this five step approach helpful for photography storytelling.
It may seem a little complicated, but I find this framework helpful for creating interesting images that evoke emotions in the viewer.
P.S.: Do you need some inspiration for your self portrait photography shoots?
Then download my free e-book below:
Free Ebook-50 Self Portrait Photography Ideas
If you love self-portrait photography, but need some fresh inspiration, download my e-book with 50 creative ideas and projects for self-portrait photography!