
A few days ago, someone on Instagram asked me how I wired these light fixtures. I gave a short explanation but knew I had to do a post about it.
Well, with all the projects done in this room, I have a big-picture archive. I went through all that pile, and here they are.
Ha, I saw some others that are good posts. I’ll see.
But first, I want to let you know
I’m NOT an electrician
Far from it, I wish I were one, though. 😉
We hired a crew to run all the electrical wires and install switches, dimmers, and even some fixtures.
I was left with patching holes and making things look pretty. This post describes how I hid the cable on each side of the built-ins.

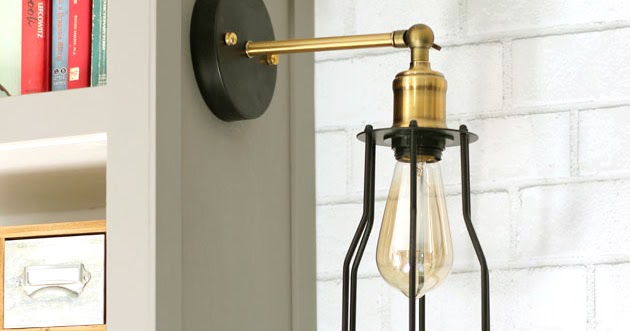
Since the beginning of this room makeover, I knew I wanted to install a set of sconces on each side of the built-ins. I was also installing can lights and relying on them to provide a very well-lit area for reading while in bed.

So, let’s go back to the part when the guys were here running those cables.
There’s an outlet right there between the two built-ins. They opened a bigger hole, about a foot up to the left of that outlet, and from there, they opened holes through the 2 x 4s to run the cables up and to the sides.

First, you need to decide how high you want to install the sconce. I used the lower part of the top shelf as my guide. Right there, a metal round wall electrical box was installed (outside).

As you can see in the picture above, the wire was brought to the other side of the bookcase and to the back wall. It didn’t look pretty. :/

So, this is how I hid it because those guys don’t usually do this. They run the cables and install lights, but you have to patch holes in the wall or hide ugly stuff like this.
Knowing that the width of the face frame is 1½” and that the thickness of the side of the bookcase panel is ¾,” I had another extra ¾” to use. Pieces of ½” square molding were added around that side of the shelf (see the above picture).
You don’t need the tape; I had to add it to keep my husband happy. He thought that I could drive a nail through the cable by accident. Even though I assured him, it was not going to happen. Oh well, he can sleep better! 🙂

Then, ¼” plywood was added to cover the whole thing. Paint and caulking did wonders afterward.

This is how it looks now. The face frame on the top shelf is flush with the inside, and you can see the difference with the lower shelf.

When you move to the front, it is not that noticeable.

Have you done this?
What other way have you done it?
For more DIY ideas, check these out:


