A custom headboard is an excellent way to add personality, style, and functionality to your bedroom without spending a fortune. It serves as a focal point, ties your room’s design together, and allows you to showcase your creativity. Best of all, building a custom headboard is easier than you think—with just a few materials and some imagination, you can transform your bed into a statement piece.
Here’s how you can create a custom headboard for your bedroom with step-by-step instructions and inspiring ideas.
1. Upholstered Headboard
Why It Works
An upholstered headboard adds softness, comfort, and elegance to your bedroom, making it both cozy and luxurious.
How to Make It
- Materials Needed: Plywood, foam, batting, fabric, staple gun, and wall mounting brackets.
- Cut plywood to the desired size and shape of your headboard.
- Attach a layer of foam and batting to the plywood using spray adhesive.
- Stretch your chosen fabric over the foam and secure it with a staple gun at the back of the board.
- Mount the headboard to the wall or attach it to your bed frame.
Pro Tip: Use velvet or linen fabric for a high-end, polished look. Add tufted buttons for extra elegance.
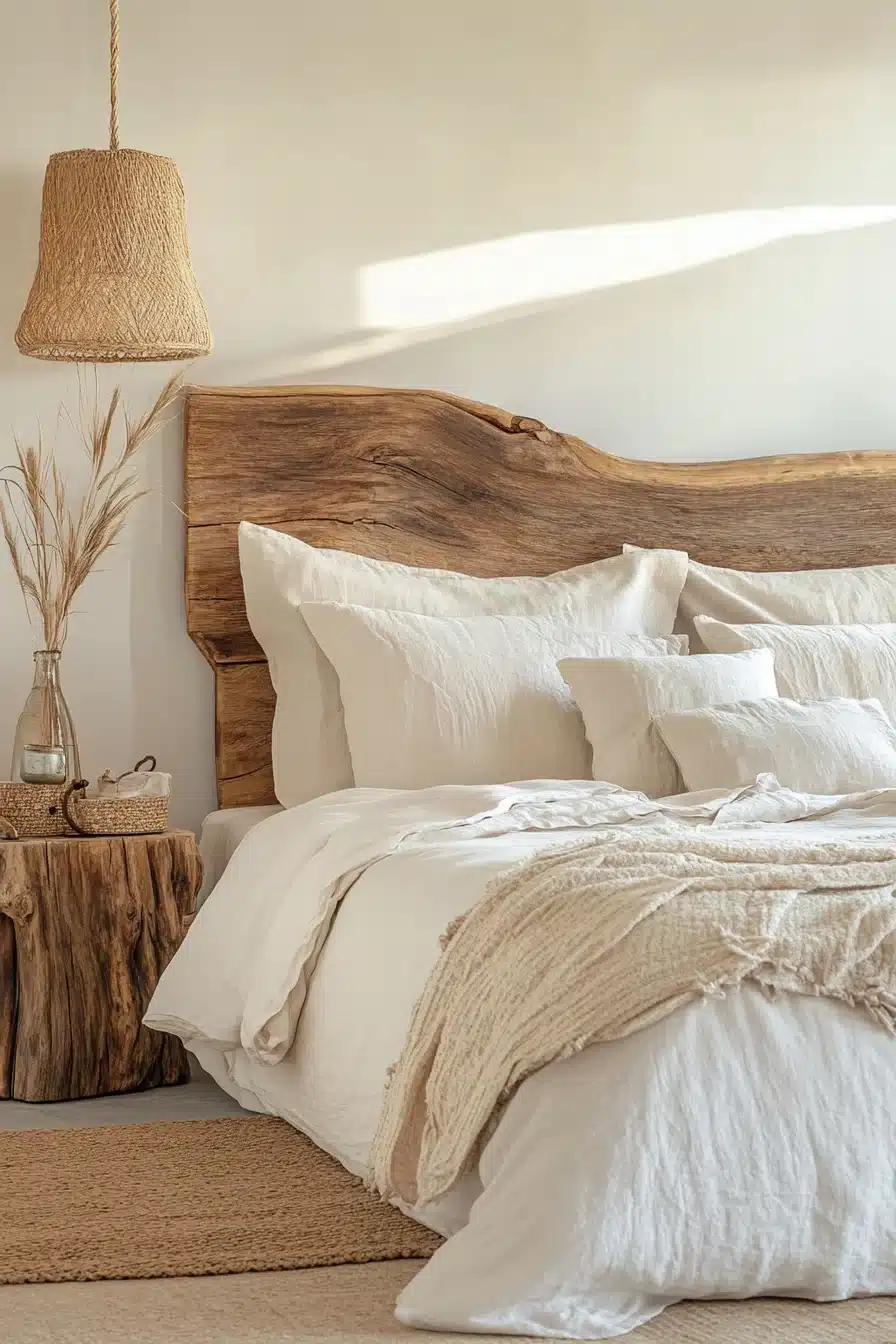
2. Reclaimed Wood Headboard
Why It Works
A reclaimed wood headboard creates a rustic, earthy vibe while repurposing materials, making it an eco-friendly choice.
How to Make It
- Materials Needed: Reclaimed wood planks, sandpaper, wood screws, and a saw.
- Cut wood planks to your desired length and sand them to remove splinters.
- Arrange the planks horizontally or vertically, stacking them to the desired height.
- Secure the planks together with wood screws and attach the headboard to the wall or bed frame.
Pro Tip: Apply a wood stain or whitewash finish for a custom color that complements your room.
3. Tufted Panel Headboard
Why It Works
Tufted panels give your bed a chic, tailored look and provide extra padding for comfortable lounging.
How to Make It
- Materials Needed: MDF or plywood, foam, batting, fabric, buttons, upholstery needle, and staple gun.
- Cut MDF into several rectangular panels and cover each one with foam, batting, and fabric.
- Use an upholstery needle to pull fabric taut and secure buttons in a tufted pattern.
- Arrange the panels in a grid and attach them to the wall using strong adhesive or brackets.
Pro Tip: Choose contrasting buttons for a modern, bold design or matching buttons for a seamless look.

4. Painted Headboard Wall
Why It Works
Skip the traditional structure and paint a headboard design directly onto your wall. It’s inexpensive, customizable, and easy to update.
How to Make It
- Materials Needed: Painter’s tape, measuring tools, paint, and a brush or roller.
- Tape off the shape of your headboard (e.g., rectangle, arch, or geometric design).
- Fill in the taped area with your chosen paint color using a brush or roller.
- Let it dry completely before removing the tape for crisp edges.
Pro Tip: Use contrasting colors or add patterns, like stripes or chevrons, to make the design pop.
5. Pegboard Headboard
Why It Works
A pegboard headboard is not only modern and minimalist but also functional, offering storage and decor opportunities.
How to Make It
- Materials Needed: Large pegboard sheet, paint, wood trim, and screws.
- Cut the pegboard to fit the width of your bed.
- Paint the pegboard in a color that complements your room decor.
- Attach wood trim around the edges for a finished look.
- Mount the pegboard to the wall and use hooks or shelves to hang lights, plants, or small storage baskets.
Pro Tip: Add string lights or greenery for a personalized, decorative touch.
6. Pallet Headboard
Why It Works
Pallets are affordable, versatile, and ideal for achieving a rustic or industrial look in your bedroom.
How to Make It
- Materials Needed: Wooden pallets, sandpaper, wood stain, and screws.
- Disassemble pallets and sand each plank to remove rough edges.
- Arrange the planks horizontally or vertically and secure them together with screws.
- Stain or paint the wood to suit your bedroom’s color palette.
Pro Tip: Add built-in shelves or lights to the headboard for extra functionality.
7. Fabric-Covered Panel Headboard
Why It Works
This easy, fabric-based project adds a soft and stylish focal point to your bed.
How to Make It
- Materials Needed: Foam panels, fabric, adhesive, and a staple gun.
- Cut foam panels to the desired shape (squares, rectangles, or other creative designs).
- Wrap each panel with fabric and secure it at the back with adhesive or a staple gun.
- Mount the panels to the wall using double-sided adhesive or Velcro strips for easy repositioning.
Pro Tip: Mix and match fabric patterns for a fun, eclectic design.

8. Shiplap Headboard
Why It Works
Shiplap offers a clean, farmhouse-inspired look and works well in both modern and rustic bedrooms.
How to Make It
- Materials Needed: Shiplap boards, wood glue, screws, and paint or stain.
- Measure and cut shiplap boards to the desired height and width.
- Attach the boards to a plywood backing or directly to the wall.
- Paint or stain the shiplap for a polished finish.
Pro Tip: For a modern twist, paint the shiplap in dark hues like navy or black.
9. Hanging Tapestry Headboard
Why It Works
A tapestry headboard is an effortless, bohemian-inspired option that adds color, texture, and personality to your bedroom.
How to Make It
- Materials Needed: Large tapestry, curtain rod, and hooks.
- Mount a curtain rod to the wall above your bed.
- Hang the tapestry on the rod and let it drape naturally behind your bed.
Pro Tip: Layer string lights over the tapestry for a magical, cozy vibe.
10. Bookshelf Headboard
Why It Works
A bookshelf headboard provides storage and display space, making it both practical and decorative.
How to Make It
- Materials Needed: Bookshelf or cube storage unit, paint, and optional baskets.
- Position the bookshelf behind your bed, aligning it with the bed’s width.
- Style the shelves with books, plants, and decorative objects. Use baskets to hide clutter.
Pro Tip: Paint or stain the bookshelf to match your bed frame for a cohesive look.

FAQs
1. What’s the easiest type of headboard to DIY?
A painted wall headboard or a hanging tapestry is the easiest option, as it requires minimal materials and tools.
2. How can I make a headboard on a small budget?
Use materials you already have, like pallets, fabric remnants, or old wood planks. Thrift stores are also great for finding affordable pieces to repurpose.
3. How do I mount a headboard to the wall?
Use heavy-duty wall brackets or French cleats for stability. For lighter options, adhesive strips or Velcro can work.
4. Can I make a headboard without power tools?
Yes! Options like fabric-covered panels, hanging tapestries, and pegboards require minimal tools and effort.
5. What fabrics work best for upholstered headboards?
Durable fabrics like linen, velvet, or faux leather are great choices. Choose a material that complements your room’s style and color scheme.
6. How can I make my headboard more functional?
Incorporate storage by adding shelves, hooks, or compartments to your headboard design. Pegboards and bookshelf headboards are excellent options.
7. How do I protect a wooden headboard?
Seal the wood with a protective finish, like polyurethane, to prevent damage from scratches or moisture.
8. Are DIY headboards sturdy?
Yes, as long as you use durable materials and secure the headboard properly to the wall or bed frame.
9. How much does it cost to make a custom headboard?
DIY headboards can range from $20 (for simple fabric designs) to $150 (for more elaborate options like tufted panels or shiplap).
10. Can I change my headboard later?
Yes! Many DIY headboards, like fabric panels or hanging tapestries, are easy to update or replace as your style evolves.
With these custom headboard ideas, you can create a stunning bedroom centerpiece that reflects your style, stays within budget, and transforms your space into a cozy retreat. Happy crafting!