In this tutorial, you’ll learn how to build a file upload and download REST API using Spring Boot 3.5.6 and Java 21. You’ll implement endpoints to upload files to the local filesystem and download them later through HTTP requests.
By the end of this guide, you’ll have a working API that supports:
- Uploading single or multiple files
- Serving stored files for download
- Organizing files safely in a configurable directory
This tutorial is ideal for backend developers who want to handle file uploads and downloads efficiently without external storage like AWS S3.
What You’ll Need
Next, we’ll set up a new Spring Boot project and add all required dependencies.
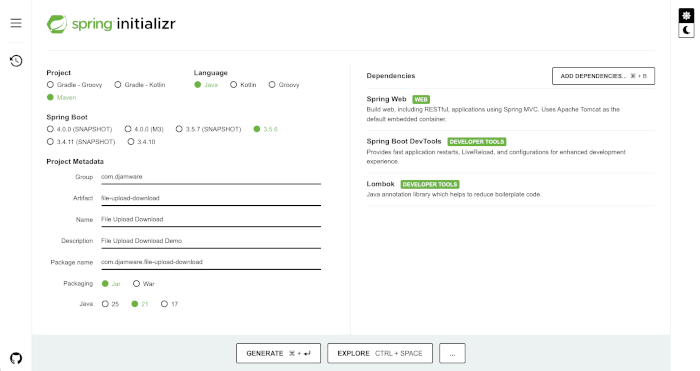
In this section, you’ll create a new Spring Boot 3.5.6 project using Spring Initializr and configure it to support file upload and download through REST APIs.
Step 1: Create a New Spring Boot Project
You can generate a Spring Boot project using Spring Initializr or your IDE’s built-in generator.
Project Metadata: Dependencies:
- Spring Web — to build REST APIs
- Spring Boot DevTools — for live reload and fast development
- Lombok — to reduce boilerplate code (getters/setters, constructors)

Click “Generate”, and extract the downloaded ZIP file into your development folder.
Step 2: Project Structure Overview
Once you open the project in your IDE, the structure should look like this:
file-upload-download/ ├── src/ │ ├── main/ │ │ ├── java/ │ │ │ └── com/ │ │ │ └── djamware/ │ │ │ └── fileuploaddownload/ │ │ │ └── FileUploadDownloadApplication.java │ │ └── resources/ │ │ ├── application.properties │ │ └── static/ │ └── test/ │ └── java/ │ └── com/ │ └── djamware/ │ └── fileuploaddownload/ │ └── FileUploadDownloadApplicationTests.java ├── mvnw ├── mvnw.cmd ├── pom.xml └── README.md
Step 3: Add Dependencies to pom.xml
If you didn’t include them during project creation, make sure your pom.xml contains the following dependencies:
<dependencies> <!-- Spring Web --> <dependency> <groupId>org.springframework.boot</groupId> <artifactId>spring-boot-starter-web</artifactId> </dependency> <!-- Lombok --> <dependency> <groupId>org.projectlombok</groupId> <artifactId>lombok</artifactId> <optional>true</optional> </dependency> <!-- DevTools --> <dependency> <groupId>org.springframework.boot</groupId> <artifactId>spring-boot-devtools</artifactId> <scope>runtime</scope> </dependency> <!-- Test (optional) --> <dependency> <groupId>org.springframework.boot</groupId> <artifactId>spring-boot-starter-test</artifactId> <scope>test</scope> </dependency> </dependencies>
Run the following command to make sure everything compiles correctly:
mvn clean install
If the build succeeds, you’re ready to configure the upload directory.
Create the File Upload Directory
Before we can upload any files, we need to define where they’ll be stored and make sure that the directory exists when the Spring Boot application starts.
Step 1: Define the Upload Directory
Open the src/main/resources/application.properties file and add the following configuration:
# File upload directory file.upload-dir=uploads
This property defines a relative folder named uploads inside your project root. You can also set an absolute path (e.g., /home/user/uploads or C:/uploads) if you want to store files elsewhere.
Step 2: Create a File Storage Service
Now, create a service class that handles initialization of the upload directory and provides access to the configured path.
File: src/main/java/com/djamware/file_upload_download/service/FileStorageService.java
package com.djamware.file_upload_download.service; import java.io.IOException; import java.nio.file.Files; import java.nio.file.Path; import java.nio.file.Paths; import org.springframework.beans.factory.annotation.Value; import org.springframework.stereotype.Service; import jakarta.annotation.PostConstruct; @Service public class FileStorageService { @Value("${file.upload-dir}") private String uploadDir; private Path fileStoragePath; @PostConstruct public void init() { try { fileStoragePath = Paths.get(uploadDir).toAbsolutePath().normalize(); Files.createDirectories(fileStoragePath); System.out.println("Upload directory initialized at: " + fileStoragePath); } catch (IOException e) { throw new RuntimeException("Could not create upload directory!", e); } } public Path getFileStoragePath() { return fileStoragePath; } }
How It Works
- The
@Valueannotation injects the directory path fromapplication.properties. - The
@PostConstructmethod runs automatically after bean initialization to create the directory if it doesn’t exist. - The
getFileStoragePath()method provides access to the absolute path for other services or controllers.
Step 3: Verify the Directory Creation
Run the Spring Boot application using:
mvn spring-boot:run
You should see a log similar to this in your console:
Upload directory initialized at: /path/to/project/uploads
And an uploads folder will appear in your project directory — ready to store incoming files!
Implement the File Upload REST API
In this section, we’ll create a REST controller that allows users to upload single or multiple files and saves them to the configured uploads directory.
Step 1: Create the File Upload Controller
Create a new controller class named FileUploadController.java inside com.djamware.file_upload_download.controller.
File: src/main/java/com/djamware/file_upload_download/controller/FileUploadController.java
package com.djamware.file_upload_download.controller; import java.io.IOException; import java.nio.file.Files; import java.nio.file.Path; import java.nio.file.StandardCopyOption; import java.util.ArrayList; import java.util.HashMap; import java.util.List; import java.util.Map; import java.util.Objects; import org.springframework.beans.factory.annotation.Autowired; import org.springframework.http.HttpStatus; import org.springframework.http.ResponseEntity; import org.springframework.util.StringUtils; import org.springframework.web.bind.annotation.PostMapping; import org.springframework.web.bind.annotation.RequestMapping; import org.springframework.web.bind.annotation.RequestParam; import org.springframework.web.bind.annotation.RestController; import org.springframework.web.multipart.MultipartFile; import com.djamware.file_upload_download.service.FileStorageService; @RestController @RequestMapping("/api/files") public class FileUploadController { @Autowired private FileStorageService fileStorageService; @PostMapping("/upload") public ResponseEntity<Map<String, Object>> uploadFile(@RequestParam("file") MultipartFile file) { Map<String, Object> response = new HashMap<>(); try { String fileName = StringUtils.cleanPath(Objects.requireNonNull(file.getOriginalFilename())); Path targetLocation = fileStorageService.getFileStoragePath().resolve(fileName); Files.copy(file.getInputStream(), targetLocation, StandardCopyOption.REPLACE_EXISTING); response.put("fileName", fileName); response.put("fileSize", file.getSize()); response.put("message", "File uploaded successfully!"); return ResponseEntity.ok(response); } catch (IOException e) { response.put("error", "Could not upload the file: " + e.getMessage()); return ResponseEntity.status(HttpStatus.INTERNAL_SERVER_ERROR).body(response); } } @PostMapping("/upload-multiple") public ResponseEntity<List<Map<String, Object>>> uploadMultipleFiles(@RequestParam("files") MultipartFile[] files) { List<Map<String, Object>> results = new ArrayList<>(); for (MultipartFile file : files) { Map<String, Object> fileResponse = new HashMap<>(); try { String fileName = StringUtils.cleanPath(Objects.requireNonNull(file.getOriginalFilename())); Path targetLocation = fileStorageService.getFileStoragePath().resolve(fileName); Files.copy(file.getInputStream(), targetLocation, StandardCopyOption.REPLACE_EXISTING); fileResponse.put("fileName", fileName); fileResponse.put("fileSize", file.getSize()); fileResponse.put("message", "Uploaded successfully"); } catch (IOException e) { fileResponse.put("error", "Failed to upload: " + e.getMessage()); } results.add(fileResponse); } return ResponseEntity.ok(results); } }
Step 2: How the Upload API Works
- The
/api/files/uploadendpoint accepts a single file under the keyfile. - The
/api/files/upload-multipleendpoint accepts multiple files under the keyfiles. - Each file is saved to the directory defined in
application.properties. - The response includes the file name, size, and a success or error message.
StringUtils.cleanPath()ensures filenames are sanitized to prevent path traversal attacks.
Step 3: Test the Upload API
Start the Spring Boot app again:
mvn spring-boot:run
Then, open Postman and send a POST request to:
Single file upload:
POST http://localhost:8080/api/files/upload
✅ You should see a response similar to:
{ "fileName": "example.txt", "fileSize": 1024, "message": "File uploaded successfully!" }
You’ll also see the uploaded file inside your uploads/ directory.
Multiple file upload:
POST http://localhost:8080/api/files/upload-multiple
Implement the File Download REST API
In this section, you’ll create a REST endpoint that lets users download files previously uploaded to the local filesystem.
Step 1: Add the Download Endpoint
Let’s extend the existing FileUploadController by adding a new method for downloading files.
File: src/main/java/com/djamware/file_upload_download/controller/FileUploadController.java
Add the following imports and method:
import org.springframework.core.io.Resource; import org.springframework.core.io.UrlResource; import org.springframework.http.HttpHeaders; import org.springframework.http.MediaType; import java.net.MalformedURLException;
Then add the download method below the upload endpoints:
@GetMapping("/download/{fileName:.+}") public ResponseEntity<Resource> downloadFile(@PathVariable String fileName) { try { Path filePath = fileStorageService.getFileStoragePath().resolve(fileName).normalize(); Resource resource = new UrlResource(filePath.toUri()); if (!resource.exists()) { return ResponseEntity.notFound().build(); } String contentType = Files.probeContentType(filePath); if (contentType == null) { contentType = "application/octet-stream"; } return ResponseEntity.ok() .contentType(MediaType.parseMediaType(contentType)) .header(HttpHeaders.CONTENT_DISPOSITION, "attachment; filename=\"" + resource.getFilename() + "\"") .body(resource); } catch (MalformedURLException e) { return ResponseEntity.status(HttpStatus.INTERNAL_SERVER_ERROR).build(); } catch (IOException e) { return ResponseEntity.status(HttpStatus.INTERNAL_SERVER_ERROR).build(); } }
Step 2: How the Download API Works
- The endpoint
/api/files/download/{fileName}retrieves a file by name. - It uses
UrlResourceto safely read the file from the filesystem. Files.probeContentType()automatically sets the correct MIME type (e.g., image/png, text/plain).- The response header includes a
Content-Dispositionfield, prompting the browser to download the file rather than display it.
Step 3: Test the Download API
Start your Spring Boot app if it’s not running:
mvn spring-boot:run
Open Postman or your browser and make a GET request to:
GET http://localhost:8080/api/files/download/example.txt
If the file exists in the uploads folder, it should start downloading automatically or show the content depending on the MIME type.
If the file does not exist, you’ll get a 404 Not Found response.
✅ Example success response headers:
Content-Type: text/plain Content-Disposition: attachment; filename="example.txt"
Optional Enhancement (File Validation)
To make it more secure, you can validate filenames to prevent malicious access:
if (fileName.contains("..")) { return ResponseEntity.badRequest().build(); // Prevent path traversal }
In this section, you’ll test the file upload and download endpoints using Postman and curl to verify that your Spring Boot REST API works correctly.
Step 1: Run the Application
Start your Spring Boot application if it’s not already running:
mvn spring-boot:run
You should see a log confirming the upload directory initialization, such as:
Upload directory initialized at: /path/to/project/uploads
Your REST API will be available at:
http://localhost:8080/api/files
Step 2: Test File Upload with Postman
✅ Single File Upload
Expected JSON response:
{ "fileName": "example.txt", "fileSize": 1024, "message": "File uploaded successfully!" }
Check your project’s uploads/ directory – the file should appear there.
✅ Multiple Files Upload
- Create a POST request to:
- Under Body → form-data, add multiple keys named
files(same key name), each with a file.
Expected JSON response:
[ { "fileName": "photo1.jpg", "fileSize": 45678, "message": "Uploaded successfully" }, { "fileName": "photo2.jpg", "fileSize": 56789, "message": "Uploaded successfully" } ]
Step 3: Test File Download with Postman
If the file exists, Postman will prompt to download it or show raw data (depending on file type).
If it doesn’t exist, you’ll get a 404 Not Found response.
Step 4: Test Using curl (Optional)
If you prefer the command line, here are equivalent curl commands:
Upload a file:
curl -X POST -F "[email protected]" http://localhost:8080/api/files/upload
Upload multiple files:
curl -X POST -F "[email protected]" -F "[email protected]" http://localhost:8080/api/files/upload-multiple
Download a file:
curl -O http://localhost:8080/api/files/download/example.txt
The -O flag tells curl to save the file with the same name.
✅ At this point, both upload and download functionalities should work smoothly. You now have a fully functional file management REST API using Spring Boot.
In this tutorial, you’ve learned how to build a Java file upload and download REST API using Spring Boot 3.5.6. You created endpoints to handle single and multiple file uploads, saved them to the local filesystem, and implemented a secure download mechanism using Spring’s Resource abstraction.
Here’s a recap of what you built:
- ✅ Configured file storage using
application.properties - ✅ Initialized the upload directory automatically on startup
- ✅ Implemented upload endpoints for single and multiple files
- ✅ Created a download endpoint to serve stored files
- ✅ Tested everything using Postman and curl
This setup provides a simple yet powerful base for managing files in a RESTful API.
Best Practices for Production
Before deploying your app, consider improving it with these best practices:
- 🔒 Validate file types and size limits
Reject unsupported file formats or restrict uploads by MIME type and file size to prevent abuse. - 🧼 Sanitize filenames
Always clean and validate filenames to avoid path traversal attacks (e.g.,../../etc/passwd). - 🧾 Unique file naming
Prevent overwriting by appending timestamps or UUIDs to filenames:
String fileName = UUID.randomUUID() + "_" + originalName;
- 🗂 Separate storage configuration
Store uploaded files in a dedicated directory outside your project structure for better security. - ☁️ Optional cloud integration
In a real-world app, consider uploading files to Amazon S3, Google Cloud Storage, or Azure Blob for scalability and reliability. - 🚫 Error handling and logging
Use a global exception handler (@ControllerAdvice) to handle errors consistently and log them for debugging.
Final Thoughts
This simple Spring Boot file API is a great starting point for projects like:
From here, you can easily expand it by adding file metadata storage (using JPA + database) or enabling cloud-based uploads.
You can find the full source code on our GitHub.
That’s just the basics. If you need more deep learning about Spring Boot, you can take the following cheap course:
Thanks!
Originally published at https://www.djamware.com.
A message from our Founder
Hey, Sunil here. I wanted to take a moment to thank you for reading until the end and for being a part of this community.
Did you know that our team run these publications as a volunteer effort to over 3.5m monthly readers? We don’t receive any funding, we do this to support the community. ❤️
If you want to show some love, please take a moment to follow me on LinkedIn, TikTok, Instagram. You can also subscribe to our weekly newsletter.
And before you go, don’t forget to clap and follow the writer️!
Learn more Java File Upload and Download with Spring Boot REST API