Learn how to download and save any remote file (PDF, DOCX, images, etc.) in React Native on both iOS and Android. This POC uses Expo and can be easily customized for your own app.
You can use it as shown below: simply pass the files array along with the headers, and all files will be downloaded simultaneously in parallel.
const getHeaders = () => {
    const headers: Record<string, string> = {};
    const token = getToken();
    if (token) {
      headers["Authorization"] = `Bearer ${token}`;
    }
    return headers;
  };
const downloadAuthenticatedFile = async () => {
    handleNotificationPermission(() => {
      const files = [
        {
          url: "https://s24.q4cdn.com/216390268/files/doc_downloads/test.pdf",
          filename: "test.pdf",
          headers: getHeaders(),
        },
      ];
      downloadFiles(files);
    });
  };
<Button
        title="Download authenticated file"
        onPress={downloadAuthenticatedFile}
      />
Android:

IOS:

The goal of this POC is to save you 70–80% of the time usually spent on building the basic file-download functionality from scratch.
👉 Before we dive in, here’s the complete code repository: GitHub — expo-file-download-poc
✨ POC Features
- Download multiple files from a remote server in parallel using file URIs.
- Show live download progress (%) for each file. Android: progress shown via notification bar.
- Group Android notifications together for cleaner UI.
- Check device storage and notify the user if there isn’t enough space to download a file.
- Android: allow users to cancel any ongoing download with a “Cancel” button.
- Notify the user when each file finishes downloading.
- After download completion, save all files together to the device’s file explorer.
Libraries we will use:
- expo-file-system: For accessing the user’s device file system
- @notifee/react-native: For showing local notifications.
- react-native-permissions: For asking Notification permission
- react-native-share: For showing “Save to Files” option for IOS and fallback “Share with” option for android.
- react-native-mmkv: We will ask for notification permission only once. We will use mmkv storage to store whether we have already asked for notification permission or not. You can also use any other preferred library of your choice.
Installation and setup:
Note: If you are stuck/confused about any step in following, just checkout my repo.
- expo-file-system:
I developed this feature on top of an Expo-managed project. I used Expo SDK 53.
Expo managed:
If you are already on the completely Expo managed (expo manages android and ios directories) project, just follow this to set this library.
Bare React Native
If you are on a bare react native project, you would not be able to use expo-file-system unless you first install expo. So in order to use expo-file-system, make sure to first install expo in your project.
Which Expo SDK version to install or upgrade to?
It depends on which react native version you have already / want to upgrade to. Every expo SDK comes up with different react native version. Not all react native versions are supported in expo. Expo maintain and supports last 3 major react native versions.

You will still be able to install expo SDK for old react native versions. But expo doesn’t maintain them actively.
Follow this to install expo in your project.
For this “updating native code” step, as you are on bare react native project, you have to do following:
- If you don’t have expo installed already and want to update to latest SDK version 54 — follow this changes.
- If you already have expo and want to upgrade to some old expo SDK version, follow this changes.
For Expo SDK ≥ 54, a new set of APIs created for this library https://docs.expo.dev/versions/v54.0.0/sdk/filesystem/. Let me know in the comments if you want the same feature using new set of APIs. But legacy file system APIs I have used in POC will also work with Expo SDK 54.
2. react-native-share:
For expo managed: https://react-native-share.github.io/react-native-share/docs/install#expo-managed-workflow
For bare react native: https://react-native-share.github.io/react-native-share/docs/install#bare-react-native
3. @notifee/react-native :
https://docs.page/invertase/notifee/react-native/installation.
Note: For my expo-managed project, even after following doc for notifee and installing it, I faced issue. I had to apply following patch for it.
npx expo install expo-build-properties
Add following patch in app.json:
"plugins": [
      [
        "expo-build-properties",
        {
          "android": {
            "targetSdkVersion": 35,
            "extraMavenRepos": [
              "../../node_modules/@notifee/react-native/android/libs"
            ]
          }
        }
      ],
]
4. react-native-permissions:
Set this up from https://github.com/zoontek/react-native-permissions#readme. We have to add notification permission support for android and ios.
5. react-native-mmkv:
Set this up from here: https://github.com/mrousavy/react-native-mmkv
Let’s begin with actual code. Code is mostly self-explainatory.
const downloadAuthenticatedFile = async () => {
    handleNotificationPermission(() => {
      const files = [
        {
          url: "https://s24.q4cdn.com/216390268/files/doc_downloads/test.pdf",
          filename: "test.pdf",
          headers: getHeaders(),
        },
      ];
      downloadFiles(files);
    });
  };
We first handle notification permission and then after it, start downlaoding of files.
export const handleNotificationPermission = (callback: () => void) => {
  //First check if notification permission already shown
  const isNotificationPermissionShown = loadPermissionShown();
  if (isNotificationPermissionShown) {
    //if shown already, don't ask it again.
    callback();
  } else {
    //If not shown, check notification permission
    checkNotificationsPermission(
      () => {
        createChannels();
        //if already granted, save it and execute callback code
        savePermissionShown(true);
        callback();
      },
      () => {
        //if not granted yet, ask for the permission
        if (isIos() || (isAndroid() && getPlatformVersion() >= 33)) {
          //only try to ask for permission for ios and android 33 and above
          requestNotificationsPermission(
            () => {
              createChannels();
              //if granted, save it
              savePermissionShown(true);
              callback();
            },
            () => {
              //if not granted, save it and execute callback code
              savePermissionShown(false);
              callback();
            }
          );
        } else {
          //for android below 33, we don't have to ask for permission as its already granted for them
          savePermissionShown(true);
          callback();
        }
      }
    );
  }
};
Through loadPermissionShown, we load from storage if we have already shown the notification or not. If its already shown, we don’t ask for it again. We just go with downloading the files. If its not shown before, through checkNotificationsPermission, we first check if user has already given permissions for our app. If not we ask for the permission requestNotificationsPermission. Note that, we only ask runtime permissions for android api ≥ 33. This is because for android versions < 33, android automatically grants the permission from following AndroidManifest.xml entry.
<uses-permission android:name="android.permission.POST_NOTIFICATIONS" />
If user grants the permission, we create Notification channel for android through createChannels. Starting in Android 8.0 (API level 26), all notifications must be assigned to a channel. You can assume using channel as grouping related notifications together. check this out for more info.
export const createChannel = (channelId: string, channelName: string) => {
  if (isIos()) {
    return;
  }
  notifee.isChannelCreated(channelId).then((isCreated) => {
    if (!isCreated) {
      notifee.createChannel({
        id: channelId,
        name: channelName,
        sound: "default",
        importance: AndroidImportance.HIGH,
      });
    }
  });
};
export const fileDownloadChannelId = "file-downloads";
export const fileDownloadChannelName = "File Downloads";
const createChannels = () => {
  //create new channels with any new channelId and channelName.
  createChannel(fileDownloadChannelId, fileDownloadChannelName);
};
I created one channel id and name and created the channel using createChannel method.
After that as we have shown the notification permission to user, I store it in storage using savePermissionShown.
Even if user denied the permission, I start downloading the files.
Let’s understand downloadFiles method step by step.
For android, notifee offers us capability to group related notifications together. That means if we have 10 downloads and want to show 10 different notifications for it, we can group them together. Each group can have 1 summary notification which will display the summary of all notifications. Note that creating channels is different than grouping. Inside one channel, you can display multiple groups of notifications.
Hence first we will display summary notification:
export const groupId = `download-group`;
export const groupAlertBehavior = AndroidGroupAlertBehavior.SUMMARY;
export const groupNotificationId = `download-summary`;
export const updateSummaryNotification = async (
  title: string,
  body?: string
) => {
  await notifee.displayNotification({
    id: groupNotificationId,
    title,
    body,
    android: {
      channelId: fileDownloadChannelId,
      groupId: groupId,
      groupSummary: true,
      groupAlertBehavior: groupAlertBehavior,
    },
  });
};
// Create summary notification (parent group holder)
updateSummaryNotification("Downloading files...");
Notifee requires us to pass “id” for every notification which we can use afterwards to update that same notification. In addition to it, we will also pass channel id, group id as android specific properties. Also its necessary to pass groupSummary as true.
IOS doesn’t support grouping of notifications. Its treated just as any separate notification.
Then for each file, we show the separate notfication which notifies the starting of download for that file
export const getNotificationId = (filename: string) => `download-${filename}`;
export const updateFileNotification = ({
  file,
  title,
  body,
  progress,
  actions,
  iosSound,
}: {
  file: DownloadFile;
  title: string;
  body?: string;
  progress?: { indeterminate: boolean; max: number; current: number };
  actions?: {
    title: string;
    pressAction: { id: string; launchActivity: string | undefined };
  }[];
  iosSound?: string;
}) => {
  const notificationId = getNotificationId(file.filename);
const androidRequest: NotificationAndroid = {
    channelId: fileDownloadChannelId,
    onlyAlertOnce: true,
    groupId: groupId,
    groupAlertBehavior: groupAlertBehavior,
  };
  if (progress) {
    androidRequest.progress = progress;
  } else {
    androidRequest.progress = undefined;
  }
  if (actions) {
    androidRequest.actions = actions;
  } else {
    androidRequest.actions = [];
  }
  const request: Notification = {
    id: notificationId,
    title,
    android: androidRequest,
  };
  if (iosSound) {
    request.ios = {
      sound: iosSound,
    };
  }
  if (body) {
    request.body = body;
  } else {
    request.body = "";
  }
  console.log("Updating notification", request);
  notifee.displayNotification(request);
};
files.forEach((file) => {
       const truncatedFilename = truncate(file.filename);
       updateFileNotification({
        file,
        title: `Downloading: ${truncatedFilename}`,
        body: undefined,
        progress: undefined,
        actions: [],
        iosSound: undefined,
       });
    });
Here we generate “id” for each notification through getNotificationId. We will use same id later to update that notification once download finish.
Also notice we need to truncate the file name to fit the file name in case its very long.
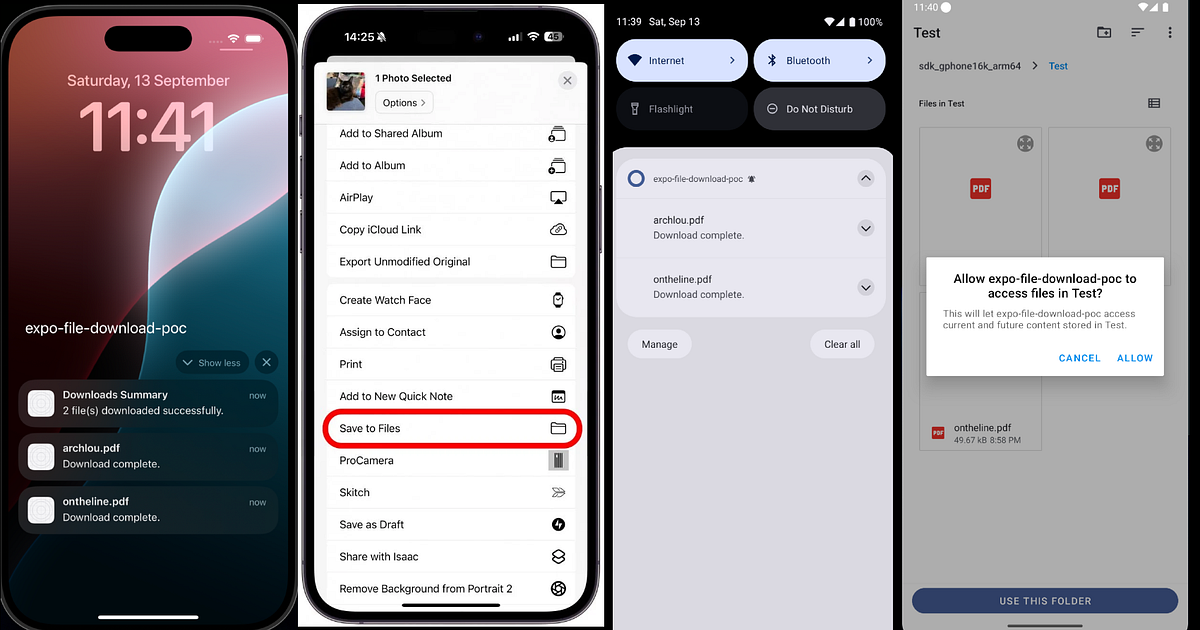
After starting download, functionality differs for android and IOS.
For Android:
We first download the files temporarily to File system document directory. Once its downloaded, we ask to user where it wants to save the file in “My Files” section and ask for permission to save it. Once user gives permission to save file in certain directory in “My files” section, we move the files in that location.
For IOS:
We first download the files temporarily to File System document directory. IOS directly supports “Save to Files” feature which we will implement through react-native-share. On IOS, once file is downloaded to document directory, through react-native-share you can open following popup through which user is able to save all the files to the file explorer.

For android, first we will ensure directory where we want to temporarily download the files, exist. If not we create it.
export const DOCUMENT_DIR = `${FileSystem.documentDirectory}`;
export const doesDirExist = async (dir: string) => {
  const dirInfo = await FileSystem.getInfoAsync(dir);
  return dirInfo.exists;
};
// Creates the directory
export const createDir = async (dir: string) => {
  await FileSystem.makeDirectoryAsync(dir, { intermediates: true });
};
// Checks if gif directory exists. If not, creates it
export const ensureDirExists = async (dir: string) => {
  const isExist = await doesDirExist(dir);
  if (!isExist) {
    console.log("File directory doesn't exist, creating…");
    await createDir(dir);
  }
};
await ensureDirExists(DOCUMENT_DIR);
Then for each file before starting the download, we check if we have sufficient memory in our device to download that file. If not, then we display the same in notification like this:
handleNotificationPermission(() => {
      const files = [
        {
          url: "https://ash-speed.hetzner.com/10GB.bin",
          filename: "10gb.bin",
          size: 10 * 1024 * 1024 * 1024,
        },
      ];
      downloadFiles(files);
    });
export const getRemoteFileSize = async (
  url: string
): Promise<number | null> => {
  try {
    const response = await fetch(url, { method: "HEAD" });
    const contentLength = response.headers.get("Content-Length");
    return contentLength ? parseInt(contentLength, 10) : null;
  } catch (e) {
    console.error("Error fetching file size:", e);
    return null;
  }
};
export const getFreeDiskStorage = async () => {
  const info = await FileSystem.getFreeDiskStorageAsync();
  return info;
};
let remoteFileSize = await getRemoteFileSize(file.url);
        let fileSize = file.size;
        if (!remoteFileSize && !fileSize) {
          throw new Error("Failed to get remote file size");
        }
        const freeDiskStorage = await getFreeDiskStorage();
        if (freeDiskStorage < (remoteFileSize || fileSize)) {
          throw new Error("Not enough disk space");
        }
Either you can pass the size from outside or if size doesn’t exist from user, before downloading we find the file size and then we check if users device has available disk space to download that file. If not, we display the error notification like this
updateFileNotification({
          file,
          title: `${truncate(file.filename)}`,
          body: "Failed: " + error.message,
          progress: undefined,
          actions: [],
          iosSound: "default",
        });
This is how it looks like:

Then we start actual download and track its progress and show it in the notification inside progress bar. Android supports progress bar. Ios doesn’t support it.
export const download = async (
  file: DownloadFile,
  callback: (progress: FileSystem.DownloadProgressData) => void
): Promise<FileSystem.FileSystemDownloadResult | undefined> => {
  const downloadResumable = FileSystem.createDownloadResumable(
    file.url,
    getFileDownloadPath(DOCUMENT_DIR, file.filename),
    file.headers ? { headers: file.headers, md5: true } : { md5: true },
    callback
  );
  const notificationId = getNotificationId(file.filename);
  const result = await downloadResumable.downloadAsync();
  return result;
};
Above method downloads any file. It accepts a callback which which we pass on to the createDownloadResumable method which gives us the realtime bytes download progress of the specific file.
const lastProgressMap: Record<string, number> = {};
const result = await download(file, (progress) => {
          const prog =
            progress.totalBytesWritten / progress.totalBytesExpectedToWrite;
          const percent = Math.floor(prog * 100);
          console.log("Received progress for " + file.filename + ":", percent);
if (percent > 100 || percent < 0) {
            return;
          }
const lastReported = lastProgressMap[file.filename] ?? 0;
if (percent === 100) {
            // Always update on complete
            updateFileNotification({
              file,
              title: `${truncate(file.filename)}`,
              body: "Download complete.",
              progress: undefined,
              actions: [],
              iosSound: "default",
            });
            lastProgressMap[file.filename] = 100;
          } else {
            // Calculate threshold bucket (0–9 → 0, 10–19 → 10, etc.)
            const currentBucket = Math.floor(percent / 10) * 10;
            const lastBucket = Math.floor(lastReported / 10) * 10;
if (currentBucket > lastBucket) {
              // Only update if we crossed a new bucket
              updateFileNotification({
                file,
                title: `Downloading: ${truncate(file.filename)} - ${percent}%`,
                body: undefined,
                progress: {
                  indeterminate: false,
                  max: 100,
                  current: percent,
                },
                actions: [
                  {
                    title: "Cancel",
                    pressAction: {
                      id: "cancel",
                      launchActivity: undefined,
                    },
                  },
                ],
                iosSound: undefined,
              });
              lastProgressMap[file.filename] = percent;
            }
          }
        });
We call this method for each file and calculate percent of download completed till now. We make use of lastProgressMap to show the download progress in buckets.
That means instead of showing progress like
1 -> 2 -> 3 -> 4 -> 5 -> 6 -> 7-> 8-> 9 -> 10 -> 11-> 12 … upto 100
We show it like this:
1 -> 10 -> 20 -> 30 -> 40 … upto 100
When download percentage reaches 100, we update notification to show “Download complete”.
While download is in progress, we show the “Cancel” button. User can cancel the ongoing file download. We will see its click implementation later.
After all files download promises are settled, we update the summary notification.
updateSummaryNotification(
      "Downloads Summary",
      failCount === 0
        ? `${successCount} file(s) downloaded successfully.`
        : `${
            successCount > 0 ? successCount + " succeeded, " : ""
          }${failCount} failed.`
    );
So as of now, we have downloaded all the files to the document directory temporarily. Now in case of android, we need to get permission from user about saving all files downloaded in “My Files” directory of device and in case of IOS, we need to show “Save to Files” popup.
const directoryUri = await getStoragePermissions();
      const urisToShare: string[] = [];
//Process stored files one by one
      for (let i = 0; i < successFiles.length; i++) {
        const result = successFiles[i];
        const { filename } = files[i];
if (result.status === "fulfilled") {
          const { uri } = result.value;
          if (Platform.OS === "android") {
            if (directoryUri) {
              try {
                const base64 = await readFileContentAsBase64(uri);
                const fileUri = await createNewFile(
                  directoryUri,
                  filename,
                  result.value.headers["content-type"]
                );
                await writeFileContent(fileUri, base64);
              } catch (err) {
                console.log(`❌ Error saving ${filename} to Downloads`, err);
              }
            } else {
              // Android fallback: add to share list
              urisToShare.push(uri);
            }
          } else {
            // iOS: add to share list
            urisToShare.push(uri);
          }
        } else {
          console.log(`❌ Download failed for ${filename}`, result.reason);
        }
      }
For android: We get the directory permission. If user grants, we read the file content as base64 and then create new file in that directory which user granted permission for. Then in that new file, we write all the base 64 contents.
If user deny permission for directory for android, we store all uris into urisToShare.
For IOS: For ios also, we store all uris into urisToShare
import Share from "react-native-share";
export const shareFile = async (urisToShare: string[]) => {
  try {
    await Share.open({
      urls: urisToShare,
      failOnCancel: false,
      saveToFiles: true,
    });
  } catch (err) {
    throw err;
  }
};
if (urisToShare.length > 0) {
        try {
          await shareFile(urisToShare);
        } catch (err) {
          console.log("❌ Error sharing files:", err);
        }
      }
Now at the end we use shareFile method from react-native-share which opens the “Save to Files” popup for ios and stores all the uris into location user selects. For android in case user deny permission for directory/ doesnt save anything, it opens the popup like this where user is given an option to share it with any other app.

At the end once everything is done, we delete the directory where all the temp files were saved.
export const deleteAllFiles = async () => {
  console.log("Deleting all files…");
  await FileSystem.deleteAsync(DOCUMENT_DIR);
};
deleteAllFiles();
Now let’s see how we can handle “Cancel” button click for any ongoing file download. Expectation is once user clicks on cancel for any file download, ongoing download should be stopped and notification should be removed.
For that we first maintain and store all the download resumable objects which is returned from FileSystem.createDownloadResumable method.
import * as FileSystem from "expo-file-system";
export const activeDownloads: Record<string, FileSystem.DownloadResumable> = {};
export const fetchDownload = (id: string) => {
  return activeDownloads[id];
};
export const storeDownload = (
  id: string,
  downloadResumable: FileSystem.DownloadResumable
) => {
  activeDownloads[id] = downloadResumable;
};
export const removeDownload = (id: string) => {
  delete activeDownloads[id];
};
export const eraseDownloads = () => {
  Object.keys(activeDownloads).forEach((key) => {
    removeDownload(key);
  });
};
Then while starting each download, we store the download resumable object.
export const download = async (
  file: DownloadFile,
  callback: (progress: FileSystem.DownloadProgressData) => void
): Promise<FileSystem.FileSystemDownloadResult | undefined> => {
  const downloadResumable = FileSystem.createDownloadResumable(
    file.url,
    getFileDownloadPath(DOCUMENT_DIR, file.filename),
    file.headers ? { headers: file.headers, md5: true } : { md5: true },
    callback
  );
  const notificationId = getNotificationId(file.filename);
  //store download resumable.
  storeDownload(notificationId, downloadResumable);
  const result = await downloadResumable.downloadAsync();
  return result;
};
This gives us capability to pause, resume, stop the ongoing download.
downloadResumable.cancelAsync()
Above method cancels the ongoing download for certain download resumable object.
Now whenever user clicks on notification while app is in foreground, notifee sends us those click events in onForegroundEvent.
Whenever user clicks on notification while app is in background, notifee sends us those click events in onBackgroundEvent.
Also if you remember while showing cancel button, we had attached an id to it.
               actions: [
                  {
                    title: "Cancel",
                    pressAction: {
                      id: "cancel",
                      launchActivity: undefined,
                    },
                  },
                ],
notifee.onBackgroundEvent(async ({ type, detail }) => {
  if (type === EventType.ACTION_PRESS && detail.pressAction?.id === "cancel") {
    const notificationId = detail.notification?.id;
    if (!notificationId) return;
console.log("Cancel pressed for", notificationId);
await cancelNotification(notificationId);
  }
});
notifee.onForegroundEvent(async ({ type, detail }) => {
  if (type === EventType.ACTION_PRESS && detail.pressAction?.id === "cancel") {
    const notificationId = detail.notification?.id;
    if (!notificationId) return;
console.log("Cancel pressed for", notificationId);
await cancelNotification(notificationId);
  }
});
Here’s how we will match the action button id and also notification id inside these 2 event handlers and then call cancelNotification.
const cancelNotification = async (notificationId: string) => {
  // 1. Cancel notification
  await notifee.cancelNotification(notificationId);
// 2. Cancel actual download
  const resumable = fetchDownload(notificationId);
  if (resumable) {
    try {
      await resumable.cancelAsync();
      console.log(`✅ Download cancelled: ${notificationId}`);
    } catch (err) {
      console.log(`❌ Error cancelling: ${notificationId}`, err);
    } finally {
      removeDownload(notificationId); // cleanup
    }
  }
};
cancelNotification will actually first remove the notification from notification bar. Then it will fetch resumable object for that notification and stop the ongoing download. Finally it will cleanup resumable object which was stored inside activeDownloads.
Also if file download and save was successful, at the end we remove all the resumable objects.
eraseDownloads();
That’s it. I hope this POC was helpful to you. Once you understand this you can add many features on top of this as per your requirement.
I’ve already created various tech blogs in my leisure time. You can find more of such articles on my profile.
To stay updated on future articles, don’t forget to follow me! After following, you’ll get future articles right in your email inbox. Also, give this post 50 claps 👏 if you enjoyed this post and learned something useful. Your enthusiasm and support fuel my passion for sharing knowledge in the tech community.
Learn more React Native Download File Example (PDF, Docs, Any File) for iOS and Android