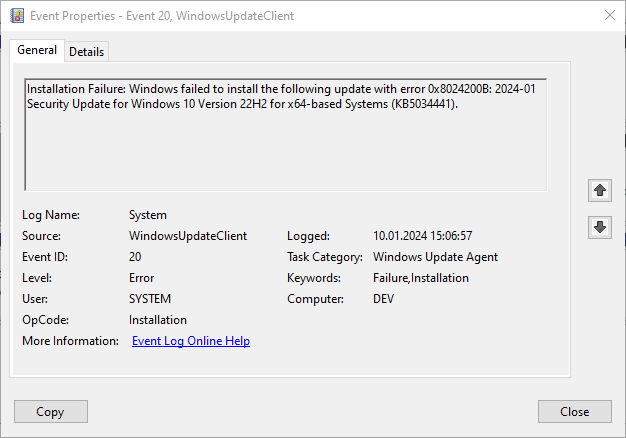
2024–01 Security Update for Windows 10 Version 22H2 for x64-based Systems (KB5034441)
The following screenshots show the error and details that can be received after starting the update during Windows update.


Please follow the steps below to fix this problem. You can use Command Line or PowerShell for this. However, make sure that it is opened in administration mode.
reagentc /info
When the above command is executed, you may see two different screenshots. The first is Windows RE status: Disable.

the second is Windows RE status: Enable
If Windows RE status: Disable, please continue with the solution in section A (Solution A) below.

If Windows RE status: Enable, please continue with the solution in section B (Solution B) below.
SOLUTION A:
If it is not set to disable, to make it disable:
reagentc /disable

diskpart

When executing the commands below, select the disk on which the operating system is installed. Your computer may not have this disk 2.
list disk
select disk 2
Likewise, the partition on which the operating system is installed should be selected. Your computer may not have this partition 2.
list part
sel part 2
Be careful with both disk and partition selections.
shrink desired=250 minimum=250
Above 250MB is given as the shrink value. This may need to be allocated more as backup space on your computer. You can fix the problem by changing the value here to a higher value.
However, if you have never had Windows RE space before, 250MB should be enough.

There is one caveat for the execution of the next command. Execute the following command and check the screen output.
list disk

In the screen output above, there is no mark (*) in the GPT area of the disk where the operating system is installed, in this case Disk 2.
For MBR Disk, the following command will be executed in such a case.
create partition primary id=27
However, if the disk space where the operating system is installed has a * in the GPT property, the following command will be executed. An example screenshot would be as follows.

create partition primary id=de94bba4-06d1-4d40-a16a-bfd50179d6ac
gpt attributes =0x8000000000000001
The following commands can then be executed.
list part
format quick fs=ntfs label=”Windows RE tools”
list vol
exit

reagentc /enable
reagentc /info

Run Windows Update again and you can observe that it was successful.

SOLUTION B:
reagentc /disable

diskpart

When executing the commands below, select the disk on which the operating system is installed. Your computer may not have this disk 0.
list disk
select disk 0
Likewise, the partition on which the operating system is installed should be selected. Your computer may not have this partition 3.
list part
sel part 3

Be careful with both disk and partition selections.
shrink desired=250 minimum=250
Above 250MB is given as the shrink value. This may need to be allocated more as backup space on your computer. You can fix the problem by changing the value here to a higher value.
However, we will also delete the space that existed before and add an additional 250MB to it.

Then select the Recovery area that was previously created with the windows installation.
sel part 4
delete partition override

In the screen output above, the disk on which the operating system is installed, in this case Disk 0, has a * in the GPT field in its properties.
In such a situation The following commands are run to recreate the Windows RE space.
create partition primary id=de94bba4-06d1-4d40-a16a-bfd50179d6ac
gpt attributes =0x8000000000000001
If the disk where the operating system is installed is Disk 0 in this example, if there is no * in the gtp property, the following command must be executed.
create partition primary id=27
After executing the necessary commands for both cases, continue by executing the following command.
format quick fs=ntfs label="Windows RE tools"

If there is no * character in the GPT area of the properties of Disk 0 where the operating system is installed, i.e. in MBR format, the following command should be executed.
list vol
exit
With the command above, we check the newly created Windows RE space. If you pay attention here, it is displayed as 756MB. Previously it was 505MB.

reagentc /info

reagentc /enable

Run Windows Update again and you can observe that it was successful.


View update history and KB5034441 will be displayed as installed.

Below is the problem detection and solution proposal as a video. Full video shooting was done to avoid missing anything. You can watch the solution from 42:10 seconds.
Below is the solution video for the “REAGENTC.EXE: The Windows RE image was not found.” problem.
I hope it will be useful…
REFERENCES