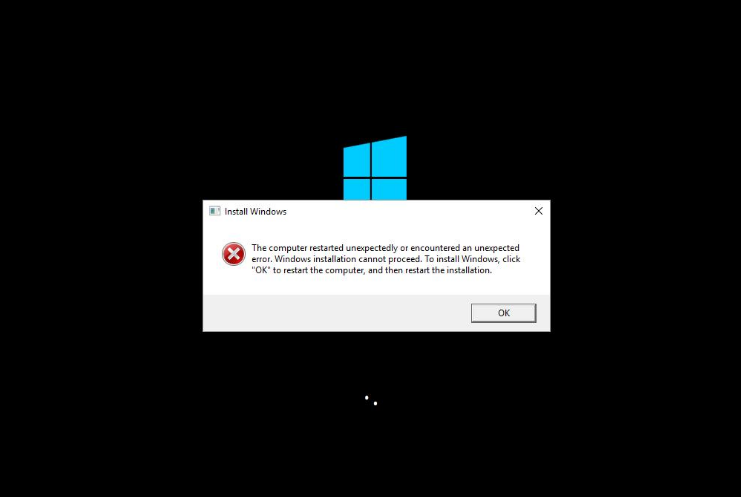
Have you ever faced “The Computer restarted unexpectedly or encountered an unexpected error, Windows installation cannot proceed” while accessing the windows servers on EC2 Instances?

This is one of the challenges when trying to access Windows servers on AWS EC2 instance. The instance is running, and the 2/2 check also passed, but the Windows server is not accessible.
When we took the screenshot for instance we saw the above error was prompting after the restart and stop & start.
You have two solutions: first, you can use a recent backup and restore, the second option is to stop the server and detach the volume and troubleshoot as below.
Steps:
- You have to stop the instance and detach the root volume and copy the volume id (for ex. vol-12345)
- Launch new windows instance and attach the root volume which is vol-12345 as a secondary volume.
- Login to the server, and download the EC2 Rescue tool using the PowerShell command
wget -o EC2_Rescue_tool.zip https://s3.amazonaws.com/ec2rescue/windows/EC2Rescue_latest.zip?x-download-source=docs
- Extract the EC2_Rescue_tool.zip and run the EC2 rescue application

- Just click on “Next” from the window and then select “Offline instance” and click Next

- Select offline disk and Next.

- You will get a prompt that says “Volume successfully loaded”. Just click OK and continue.

- On the below window just select “Diagnose and Rescue” and click on Next.

- EC2 Rescue will check all the components and report the summary. On this page just click on Next.

- On this page, you have to select all warnings which are listed and click Next.

- Just verify and click on “Rescue”.

- Once the rescue is completed you have to click on “Finish” and on the next prompt window click “OK”.

- Once the above steps are completed successfully, You have to open the “registry”.
- To open the registry, you have to run “regedit” on the Run Command.

- Once the registry is opened, expand the “HKEY_LOCAL_MACHINE” and click on “Load Hive” from the file menu.

- On the Load Hive prompt, you have to select “<AttachedDiskLetter>:\Windows\System32\config\SYSTEM” and Open.

- You have to give some names to the Hive.

- You have to expand that loaded hive and go to Setup → Status → ChildCompletion.

- Click on setup.exe and Modify.

- On the modification prompt, you have to give “value data” as“3” and click on OK.

- Now you have to Unload the Loaded Hive. To do this, you have to select the hive and then file → Unload Hive.
- It will ask for confirmation, just click “yes” and close the registry.

- Once all the above steps are completed successfully, you have to detach and attach the disk to the original instance and start the instance.